Table of contents

Cook
counselor
workshop
Adjusting suspension / damping correctly, part 2
Guide: correctly adjusting the suspension / damping, part 2
A mystery for many: the suspension adjustment on the motorcycle
Just tinkering with the undercarriage by chance does not help. It’s better if you know how the cushioning works.
Werner Koch
05/12/2011

Fact
Pull the brake, immerse the fork forcefully, observing the spring and damping behavior.
With the tips for adjusting the spring preload / spring base, the basis has been created to now use the hydraulic damping to adapt the entire system to individual needs; Because only if the geometric values are correct due to a correctly adjusted suspension, the damping can be used for fine-tuning.
Basic setting of the fork damping
Before turning the adjusting screws of the damping, it is essential to note down all original settings. To do this, turn the adjusting screws slowly click by click or in half turns clockwise. Make a note of these values.
Buy complete article

Guide: correctly adjusting the suspension / damping, part 2
A mystery for many: the suspension adjustment on the motorcycle
2 pages) as PDF
€ 2.00
Buy now
- In almost all cases, the setting values on the fork are counted from the maximum closed position. The reason: The needle valves are completely closed in this maximum position, while the minimum setting position can usually be changed during assembly.
- Once all the adjustment screws have been set to maximum, i.e. the hardest damping, push the machine into the suspension again. Do you feel a change? With an effective adjustment, the machine would have to compress and rebound more slowly. The adjustment range is designed differently depending on the fork manufacturer. Japanese manufacturers in particular work with a narrow range that usually does not allow extreme settings that can have a massive impact on driving behavior.
- Open all adjusting screws to the maximum and press the machine into the spring again. The machine now feels spongy and soft, and may even oscillate when it rebounds. By trying out different settings, you can get an impression of the effective range of the shock absorber and fork.
- Now turn all adjusting screws to the original position and start to correct the damping level as you think it is necessary.
Tip: Adjust the rebound damping of the fork so that the front section springs out a few millimeters above the starting position after rebounding and only then comes to a standstill.
For sporty use, the damping is adjusted as described above. Then turn the rebound stage in small steps until the fork no longer oscillates, i.e. it remains in its starting position immediately after rebounding. Caution: Only make one modification after the other in order to be able to clearly see the effects.
Attention: Always change the setting on both fork legs equally.
The compression damping can only be determined with great sensitivity. It is therefore determined while driving. As a starting point, select the setting recommended in the driver’s manual or a medium position and change it after the test drives in the direction of comfort (soft) or sportiness (hard).
Take a test drive and watch for changes. Better? Worse? Turn a few more clicks in the desired direction. If there is no improvement, go back to the initial value noted and try another option.

Fact
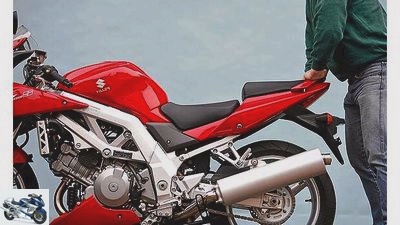
Firmly press the rear of the motorcycle into the spring while observing the damping behavior.
Basic damper setting on the shock absorber
Then press the machine into the suspension by the driver’s seat cushion. It should rebound with a noticeable delay and reach the starting position after a second at the latest. If the tail rebounds jerkily and in an uncontrolled manner or even tends to oscillate, the rebound damping must be increased. If, on the other hand, the suspension is noticeably stuck in the damping and only rebounds slowly, this must be reduced.
Even at the rear, the compression damping is hardly noticeable for the layman. Only experienced specialists can feel whether the compression resistance is the spring force, the hydraulic pressure level or the progression caused by the lever system.
The compression damping reacts to the compression speed. If you press quickly and powerfully, resistance builds up. If the compression is brought about slowly by means of a heavy weight, this resistance does not occur.
When making the basic setting, adhere to the recommended manufacturer’s values here as well. Only change this if you have one
Want to optimize in a certain direction.
Basically:
- A lot of rebound damping brakes the rebound process and makes the motorcycle more stable in alternating bends, for example. If the rebound is too hard, the motorcycle sucks itself deep into the suspension in rapidly successive bumps and becomes uncomfortable.
- With little rebound damping, the motorcycle quickly swings back to its original position after compression and absorbs subsequent shocks better. If the rebound is too soft, the machine swings over the zero position several times after bumps and becomes unstable and doughy.
- A lot of compression damping results in a firm, sporty suspension or is chosen for heavy drivers or high payloads. If the pressure level is too high, the tire bounces off hard in the case of potholes and the motorcycle becomes uncomfortable.
- Little compression stage damping creates a fine response with high suspension comfort and is suitable for light drivers, but may result in a spongy driving behavior in curves and can lead to bottoming out on strong bumps.
Attention: On the shock absorber, the rebound stage damping also influences the compression stage during the compression process thanks to the annular gap that is open in both spring directions.
Related articles
-
Suspension special: Part 3 – Strut damping
triumph accesories landing gear & Spring elements Suspension special: Part 3 – Strut damping Suspension special: shock absorber The right set-up for the…
-
Suspension guide – correctly adjusting the damping, part 1
Photos: fact accesories landing gear & Spring elements Adjusting suspension / damping correctly, part 1 Guide: Adjusting the suspension / damping…
-
Kawasaki 12th pictures Kawasaki 1/12 Current technical status: Kawasaki ZX 10R with 43 USD fork, Big Piston damping and relatively delicate triple trees….
-
Guide: Braking correctly, part 1 – without ABS
jkuenstle.de 9 pictures 1/9 Braking properly without ABS: Your colleague shows you how: knees on the tank, upper body upright, view far ahead. The arms…
-
Suspension special: Part 7 – rear
archive accesories landing gear & Spring elements Suspension special: Part 7 – rear Suspension special: rear Does the motorcycle drive strange lines?…
-
Chassis special: Part 2 – fork damping
fact accesories landing gear & Spring elements Chassis special: Part 2 – fork damping Chassis special: fork damping Front wheel damping – the dream setup…
-
motorcycles Suspension tuning Suspension tuning The right twist If you want to raid the curbs with momentum, you not only have to have yourself fully…
-
Chassis special part 1: motorcycle suspension
fact accesories landing gear & Spring elements Chassis special part 1: motorcycle suspension Chassis special: suspension Everything about motorcycle…
-
Suspension special: Part 9 – Strut tuning
Jahn accesories landing gear & Spring elements Suspension special: Part 9 – Strut tuning Suspension special: strut tuning What good is the conversion of…
-
Suspension special: Part 8 – fork tuning
Jahn accesories landing gear & Spring elements Suspension special: Part 8 – fork tuning Suspension special: fork tuning What are the real benefits of…