Table of contents
- Screwdriver tip – optimize brakes Steel bus valves – steel flex lines
- brake fluid
- Check the brake lines
- Improvements
- Steel braided lines
- Steel bus valves
- Info
- Mechanic courses
Ralf Petersen
counselor
workshop
Screwdriver tip – optimize brakes
Screwdriver tip – optimize brakes
Steel bus valves – steel flex lines
If the original brake lines are too old, they need to be converted to steel braided. And while you’re at work: Smart steel bus valves make filling and venting easier. Our screwdriver tip shows how it’s done.
Ralf Petersen
06/23/2016
If you always want to come to a safe stop, you should not only keep an eye on the brake fluid on your motorcycle, but also on the lines. For maintenance work, the conversion to Stahlbus ventilation valves and steel flex lines is recommended. Appropriate experience is of course essential: which is why unskilled screwdrivers only check and leave the rest to the workshop. There are also design-related deviations from the Honda Sevenfifty used here. Especially with ABS brake systems, the work steps are not so easy to transfer.
Buy complete article
Screwdriver tip – optimize brakes
Steel bus valves – steel flex lines
4 pages) as PDF
€ 2.00
Buy now
brake fluid
Ralf Petersen
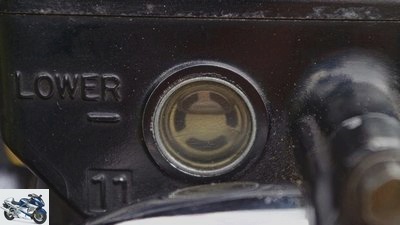
Dark or light: age control on the expansion tank.
The task of the brake fluid is to transmit pressure from the master brake cylinder to the brake caliper. The fluid level in the expansion tanks for the front and rear brakes also serves as a kind of wear indicator for the brake pads. If the level in the container drops sharply, the condition of the pads must be checked. As brake fluid ages, it should be replaced every two years. It is hygroscopic, which means that it absorbs water as it ages. The boiling point of the liquid drops, and in extreme cases this can even lead to the failure of the braking system due to the formation of vapor bubbles. Old brake fluid can usually be recognized by its color. New liquid is usually light yellow. Rule of thumb: the darker it is, the older it is. The type of DOT brake fluid is also indicated on the cover. DOT 3, 4 and 5.1 may be mixed with each other, but not with the DOT 5 type.
Check the brake lines
Many motorcyclists do not even realize that (rubber) brake lines are also wearing parts. When they come into contact with the brake fluid, they become porous and soft over time. You also notice it when braking, because the pressure point looks spongy because the rubber stretches under load. The manufacturers therefore recommend replacing the cables every four to five years. Age information is either printed on the tubes or stated on a band. Our Sevenfifty has the indication 1/94. So the line, like the motorcycle, is a proud 22 years old. Unfortunately, this is typical for many older motorcycles and, by the way, is not objected to by the TuV – it still remains a safety risk! Regardless of age, the brake lines should be checked for any chafing, kink-free installation or loose fastenings, especially after modifications.
Improvements
Regardless of whether only the brake fluid or the lines are changed – the accessories trade has useful and practical improvements in store. For easier filling and bleeding of the brake system, steel bus valves can be used, which can be exchanged for the bleeding valves installed as standard. They offer several advantages. The normal vent valve is usually not 100 percent tight on the thread during the venting process when it is open. In the Stahlbus valve, on the other hand, the built-in O-ring seals perfectly and no air can enter the brake system through the thread of the valve. The integrated check valve also eliminates the time-consuming opening and closing of the conventional valve when venting. Even more important: the non-return function can generate a volume flow that entrains even the most stubborn air bubbles and perfectly ventilates the system. In addition to venting, the steel bus valve can also be switched to the “Filling” operating mode and makes the work of completely refilling after replacing the lines considerably easier.
Steel braided lines
Ralf Petersen
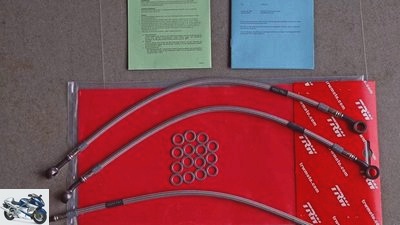
Complete kit: here from Lucas / TRW with all seals and ABE.
When replacing the cables themselves, there is virtually no alternative to steel braided cables. They are not made of rubber, but of age-resistant Teflon and are covered with a flexible wire mesh hose that protects the cable from damage such as kinking or chafing. In addition, the line expands less under pressure and the pressure point is improved. Once installed, the steel braided lines never have to be changed. Depending on the design, they are available from around 60 euros (for single-disc brakes) with ABE, so there is no need to enter them in the vehicle documents.
It goes without saying that with these advantages, nobody will use an original rubber cable that is often even more expensive. Based on positive experience in the past, when choosing the manufacturer, I decided on the cables from Lucas / TRW for the double disc brake at the front and, because of a low trade fair price, I decided on Probrake for the rear brake line. Both conversion kits were complete with seals, fitted perfectly and have an ABE.
When converting to steel braided lines, you first check how far you can pull the brake lever. If the vent screw is opened later, it can be pulled through to the handlebars. To protect the sensitive seal of the brake pump piston, do not pull the lever all the way through when pumping later. Brake fluid is very corrosive, so all vehicle parts that are in the vicinity of the brake system should be well covered to prevent splashes and escaping fluid. Always wear gloves to protect the skin.
After opening the cover of the expansion tank, the rubber seal can be removed. It is important to carefully note the level of the brake fluid. After changing the brake fluid, it is often topped up to the maximum mark. This is wrong, because the correct level depends on the condition of the brake pads. The level of the brake fluid is marked or documented with a photo. I always use a squirt bottle and mark the status with a cable tie on the suction tube. So I can later restore the exact status cleanly and easily.
First of all, the brake fluid in the expansion tank is completely sucked out with a syringe etc. On this occasion, the container can be cleaned with a clean, lint-free cloth if necessary. Now a hose that fits as well as possible, the end of which is fixed in a collecting container (e.g. old jam jar), is pushed onto the vent valve of the first brake calliper, the valve is opened and the brake fluid is pumped out as far as possible. Do the same with the second brake caliper. Then the banjo bolts of the brake line on the brake caliper can be unscrewed so that the remaining liquid can drain into a suitable container.
Now the two hollow screws of the brake line on the distributor and then the hollow screw on the hand brake pump are unscrewed and all three sections of the brake line are removed. The connections are carefully cleaned with brake cleaner and a clean, lint-free cloth.
Before the new lines are installed, they are compared with the old lines and first loosely applied to check whether they fit exactly. Pay attention to the length, angle and thickness of the ring connections. If the ring connections are thicker or thinner, other banjo bolts must be used. The steel flex ring connections can be carefully turned into the correct position with the cables I use using pliers and a suitable punch. It is essential to follow the manufacturer’s installation instructions. Of course, new sealing washers are used for the final assembly, which are usually included with the kit.
Now the brackets of the old brake lines are dismantled, attached to the new steel flex lines and these are then fitted with new sealing washers, but not yet tightened. After screwing the brackets onto the fork’s holding points, check that the installation is free of tension and chafing, even under load, and then compress the fork strongly. Without twisting the ring connections, they are now hand-tight and then tightened with the specified torque (35 Nm for the Sevenfifty).
The conversion of the brake line for the rear disc brake is basically identical. The removal of the old and the laying of the new line is much more difficult on the Sevenfifty. The brackets on the swing arm are not easily accessible because of the frame and the exhaust. So you should plan a little more time.
Steel bus valves
Ralf Petersen
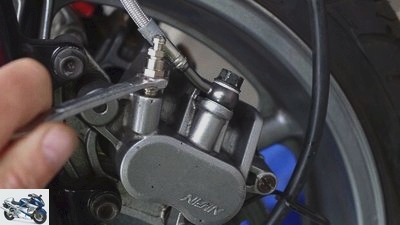
The installation of steel bus valves is child’s play.
The installation of steel bus valves is very easy. The old vent valve is unscrewed and exchanged for the new steel bus valve, then it is tightened with the same torque as the old valve (6 Nm on the Honda). The expansion tank is then filled with fresh brake fluid (observe the correct DOT class). The steel bus valve on the left brake caliper is opened 1.5 turns and is in the “fill / change” position. The valve on the right saddle still remains closed. The most important tool is the Stahlbus vacuum filling and venting aid, a kind of mini pump that can be purchased cheaply from the major accessory chains for less than ten euros. A bargain compared to the usual brake bleeders, which cost at least 100 euros in reasonable quality. The mini pump is squeezed and the hose is placed on the valve.
Thanks to the good quality of the material, the hose sits tightly on the valve. After letting go of the pump, it sucks surprisingly efficiently and without problems, so that brake fluid reaches the pump very quickly. You can still assist the process by pressing the brake lever. Always take a look into the expansion tank and check whether there is enough brake fluid. Under no circumstances should the water level drop so low that air can get into the system. If necessary, close the valve, pull off the hose, empty the pump and repeat the process. If no more bubbles can be seen in the hose, close the valve and repeat the process on the right brake caliper.
Of course, the brake system now has to be vented. If the Stahlbus valve is only opened half a turn, it is in the “venting” position. The mini pump can also be connected here. Now all you have to do is pump with the brake lever. At first you don’t seem to notice any change, but then you feel how pressure slowly builds up, and finally the brake is perfectly vented as if by magic. At the end the brake fluid is refilled to the correct level – done.
Info
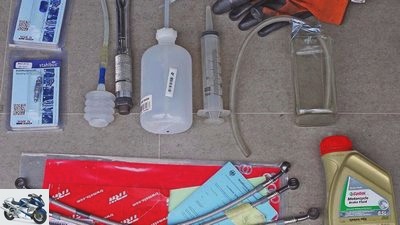
What is needed:
- Repair manual
- Table with tightening values
- Matching steel bus valves
- Stahlbus vacuum venting aid
- Steel braided lines
- brake fluid
- Collecting vessel
- hose
- Torque wrench and matching sockets
- Syringe / squirt bottle for suction
Material costs:
- Steel braided line set in front (e.g. from Lucas / TRW, approx. 130 euros)
- Steel braided line at the rear (e.g. from Probrake, approx. 35 euros)
- 3 steel bus valves, 22.90 euros each
- 3 aluminum caps, 5.99 euros each
- Vacuum venting aid, 8.95 euros
- Brake fluid, 6.99 euros
Costs in the workshop:
- Honda authorized workshop and independent workshop: approx. 100 euros wages for double windows in the front and approx. 70 euros for the rear, plus material (according to telephone information)
Mechanic courses
Ralf Petersen
Ralf Petersen has been organizing mechanics courses for 21 years.
Ralf Petersen. The author works as a further education teacher at the VHS Duisburg and has been organizing mechanics courses for 21 years. 12 to 15 practical seminars on maintenance, repair and technology are offered every year. In 2015, Delius Klasing-Verlag published his book “Basiswissen Motorrad-Technik”.
info:
- www.icopter courses.de.ki
- Facebook: Motorrad-Technik Petersen
Related articles
-
Screwdriver tip for the check before the main inspection
Ralf Petersen 14th pictures Ralf Petersen 1/14 Don’t forget: papers, ABEs, tire approvals and a key for the steering lock. Ralf Petersen 2/14 Only with…
-
Workshop – screwdriver tip for the inspection
Ralf Petersen 15th pictures Ralf Petersen 1/15 Every motorcycle must be serviced regularly if it is to function properly. Ralf Petersen 2/15 What is…
-
Screwdriver tip oil change and oil level check
Photo: mps photo studio 14th pictures Honda 1/14 Screwdriver tip – oil change and oil level check. Ralf Petersen 2/14 Preparation: All of this is needed….
-
accesories Service special brakes Service special brakes Technology brake discs Ceramic brake discs are the latest hit. MOTORRAD had the opportunity to…
-
Screwdriver tip on the subject of valve control
Ralf Petersen 15th pictures Ralf Petersen 1/15 The valve train controls the gas exchange in a four-stroke engine with the help of the inlet and outlet…
-
Screwdriver tip exhaust system – Honda CB 750 Seven Fifty
Ralf Petersen 14th pictures Ralf Petersen 1/14 The starting point: a Honda CB 750 Sevenfifty for 850 euros, first registration February 1994. Ralf…
-
MOTORCYCLE screwdriver tip on starting problems
Ralf Petersen 19th pictures Ralf Petersen 1/19 Starting problems on the motorcycle are tricky. They can occur without warning, whether the engine is cold…
-
Everything about motorcycle brakes
fact counselor workshop Everything about motorcycle brakes Everything about motorcycle brakes Brake system report Progress through perfect standstill….
-
What matters when it comes to MotoGP brakes
PSP / LukaszSwiderek 12th pictures 2snap 1/12 2snap 2/12 The rear brake is hardly required for decelerating. However, it often functions as a…
-
Screwdriver tips for motorcycle seats
Ralf Petersen 13th pictures Ralf Petersen 1/13 Ralf Petersen 2/13 Ralf Petersen 3/13 Ralf Petersen 4/13 Ralf Petersen 5/13 Ralf Petersen 6/13 Ralf…