Table of contents
- Adviser: Change Simmerrings Change the oil seals on the telescopic fork
- When removing the bearing shells …
- Emergency solutions in the event of a leaky fork
- More about technology
Cook
counselor
workshop
Adviser: Change Simmerrings
Adviser: Change Simmerrings
Change the oil seals on the telescopic fork
If the fork oil finds its way out into the open, there’s work to do. Because to replace the Simmerrings, the telescopic fork has to be completely dismantled. A job for specialists or talented hobby screwdrivers with an extensive range of tools.
Franz Josef Schermer
03/26/2009
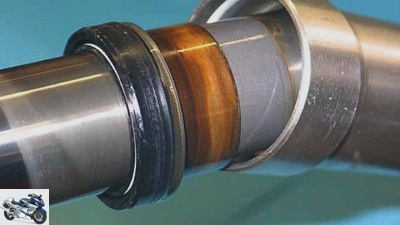
Based on the screwdriver tips in MOTORRAD 4 and 6/2009, changing the Simmerrings goes one step further. However, the sliding tube must first be examined for possible damage to the chrome-plated surface. Even the smallest breakouts would destroy the new sealing ring in a very short time. And a new sealing ring can only compensate for deep tracks and grooves for a short period of time.
Anyone who goes to work with a hammer, punch and brute force destroys more than whole.
Work on changing the Simmerrings can begin when the springs and oil have been removed from the fork legs. All further steps are almost identical for conventional and upside-down forks. In both cases, the central connection via the damper insert (A) must be released. The hollow screw is located at the bottom of the immersion tube, accessible through the axle bore, and is usually glued in place. As a result, the damper housing rotates in the fork and has to be blocked using a special tool. The tinkerer can make this out of a suitable steel pipe (B) if he can identify the toothing shape of the damper. Caution: When removing the central screw, the sealing ring often gets stuck in the hole and can be lost when cleaning.
In the next step, the dust cap over the Simmerring is carefully levered off with a screwdriver (C) and the wire locking ring underneath is removed (D). It is essential to ensure that the chrome-plated surface of the standpipes or immersion tubes is not damaged.
To make it easier to remove the pressed-in Simmerring from the aluminum spar, it should be heated with a hot air blower. Then the immersion tube is clamped in a solid vice with aluminum protective jaws and the standpipe is pulled out with strong, jerky movements (E). With the Simmerring, the slotted bearing shells also appear, which are pulled off by spreading them open. It is essential to pay attention to the sequence, installation direction and wear. The mostly gray Teflon layer of the bearing shells must be preserved throughout. If the metal underneath shimmers through, a renewal is inevitable. There is no general wear dimension or radial play because the installation tolerances are designed according to the design and application.
workshop
Advice: change fork
Remove and install the fork properly
read more
workshop
Advice: change fork oil and springs
Replace fork oil and springs
read more
When removing the bearing shells …
Cook
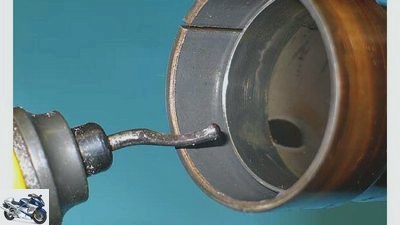
The resulting burr must be smoothed and the chips removed thoroughly.
… A fine burr often forms on the larger fixed bearing, which must be removed with a suitable tool and a 300 lapping line. Then thoroughly clean the bearing shell and all other components.
Before installing the new Simmerring, the screwed-in, sharp-edged grooves of the bearing shells should be covered with thin packet adhesive strips. In this way, the sensitive sealing lips previously coated with silicone grease are not damaged when slipped on. Then remove the adhesive strips, mount the bearing shells and steel washer and slide the entire package into the immersion or standpipe. The flexible wire ring can also be installed after assembly. With conventional telescopic forks, a long tube with a suitable washer can be used to press in the Simmerrings to protect the sealing rings.
It gets a little more complicated with upside-down forks. With them, a two-part sleeve (H) must be inserted between the dust cap and the Simmerring, via which the sealing ring and bearing shell can then be pressed in. During this process, too, the seat in the aluminum standpipe or immersion tube is heated beforehand and thus expanded. The half-shells can be securely fixed with an O-ring, which is slightly smaller in diameter than the standpipe or immersion pipe. The O-ring then remains on the standpipe as a spring travel indicator.
Attention: Under no circumstances drive in the Simmerrings with a punch. They will be damaged, and if things go wrong, the chrome surface of the standpipes will also be bad. After these steps, the damper insert is reconnected to the central screw (Loctite) and further assembly is continued as described in MOTORRAD 6/2009. You can find out how the steering head bearing is adjusted in MOTORRAD 10/2009.
Emergency solutions in the event of a leaky fork
Cook
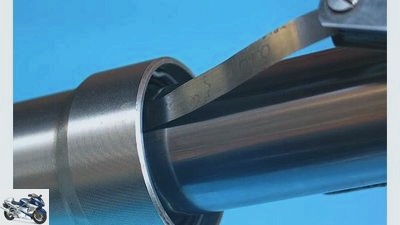
The sealing lips are carefully cleaned with a 0.10 feeler gauge.
Great, in the middle of the Spanish highlands, the oil gushes out of the fork like from an oil well, and the nearest authorized workshop is half a trip around the world. To prevent the oil grease from disabling the brake system, a cleaning rag wrapped around the dip tube helps for the time being. Especially with enduro bikes, dust and dirt occasionally settle in the oil seals. To remove these disruptive factors, first remove the dust cap and then carefully insert a feeler gauge with a thickness of 0.10 between the sealing lips and the immersion tube. Once painted all around, the dirt can be transported out, whereupon the sealing rings may live up to their name again.
No success and no new parts in sight? Then it is time to remove the fork seal ring and remove the small preload ring on the inside. The screwed connection point can be found by feeling and opened like a thread. The spiral spring is then shortened by about ten millimeters, screwed back together and carefully reassembled. The shortening increases the preload and the sealing lip is pressed onto the standpipe or immersion tube with more pressure. Which, in the event of luck, leads to a sufficient seal However, an exchange at the next opportunity is inevitable.
More about technology
PS knowledge: technology
- Motorcycle technology clearly explained on 97 pages (PDF)
- From starter to spark plug
- Simple teaching of physical principles
- Tips and tricks for practitioners
To the PDF for € 9.99
#image.jpg
Related articles
-
counselor workshop Change fork sealing rings Change fork sealing rings Change fork sealing rings Loss of oil on the telescopic fork is not just a…
-
Adviser: change the steering head bearing
Schermer counselor workshop Adviser: change the steering head bearing Adviser: change the steering head bearing Check and replace steering head bearings…
-
Adviser: change the wheel bearing
Schermer 7th pictures Schermer 1/7 Changing the wheel bearing Step 7: When driving in, carefully tap into the outer ring with a mandrel.. Schermer 2/7…
-
Change the steering head bearing
counselor workshop Change the steering head bearing Change the steering head bearing Change the steering head bearing If the bearing in the steering head…
-
Schermer 8th pictures Schermer 1/8 The correct distance can be found in the manual. Use a lot of feeling when re-bending. Schermer 2/8 Above the spark of…
-
Advice: change fork oil and springs
Schermer counselor workshop Advice: change fork oil and springs Advice: change fork oil and springs Replace fork oil and springs Because abrasion and…
-
Tire change in the MOTORRAD workshop part 1 and 2
Frill counselor workshop Tire change in the MOTORRAD workshop part 1 and 2 Tire change in the MOTORRAD workshop part 1 and 2 How to change a rear tire…
-
Varta counselor workshop Adviser: the battery Adviser: the battery Everything about the battery It’s almost close, the season is about to start. In order…
-
counselor workshop Change the wheel bearing Change the wheel bearing on the motorcycle With a mandrel, hot air and bearing grease Changing wheel bearings…
-
counselor workshop Change the air filter Change the air filter Change the air filter Fuel consumption too high? Rough engine run? A dirty air filter can…