Table of contents
- Adviser: change the steering head bearing Check and replace steering head bearings
- More about technology
- Removal and installation
Schermer
counselor
workshop
Adviser: change the steering head bearing
Adviser: change the steering head bearing
Check and replace steering head bearings
Regardless of whether ball or tapered rollers, the bearings in the steering head must be technically flawless and set so that they run smoothly but without play. But even then they wear out over time. This article explains how steering head bearings are checked and replaced.
Franz Josef Schermer
05/22/2009
Check steering head bearings
To check the bearings, the motorcycle must be jacked up so that the steering is free; the front wheel must not have any contact with the ground. You can do this with a work stand at the rear and a jack under the engine or by hanging the machine on the frame at the front.
1. Slowly swivel the steering from stop to stop and check for uneven movement, detent or hook. Cables, brake lines and cables must not hinder the steering angle. If in doubt, dismantle the handlebars with switches, brake and clutch fittings and put them down so that they are secure. Under no circumstances loosen the connections of the brake lines.
2. If the swivel movement is uneven or a grinding noise can be heard, the bearings run dry. Then at least they need to be cleaned and lubricated.
3. If the steering engages, at least one steering head bearing is defective; however, the upper and lower bearings must always be replaced.
Change the steering head bearing
The work processes for dismantling and assembling ball bearing and tapered roller steering bearings are basically the same. The only difference lies in the lower bearing: the ball ring is a loose component, while in the tapered roller bearing the cage with the tapered rollers is already mounted on the bearing inner ring.
Buy complete article
Adviser: change the steering head bearing
Check and replace steering head bearings
2 pages) as PDF
€ 2.00
Buy now
More about technology
PS knowledge: technology
- Motorcycle technology clearly explained on 97 pages (PDF)
- From starter to spark plug
- Simple teaching of physical principles
- Tips and tricks for practitioners
To the PDF for € 9.99
#image.jpg
Schermer
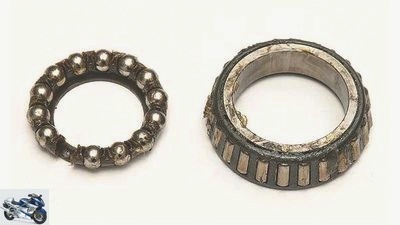
Pitting on the tapered rollers causes an irritating driving experience.
Remove triple clamps with steering stem
1. Jack up or hang up the motorcycle so that the front wheel is free.
1.1. Dismantle the fairing parts so that there is unhindered access to the upper and lower triple clamps.
1.2. Dismantle the handlebars and put them down safely. Handlebar fittings can remain installed as long as cables and cables do not hinder the removal of the upper triple clamp.
2. Remove the front wheel and fork legs. Again: DO NOT loosen the screw connections of the brake lines on the brake calipers, brake pump and distributors!
3. Loosen the steering column tube head nut and turn it off: Turn the steering to the left against the steering stop.
4. Remove the upper triple clamp. When it is firmly in place, spray the contact points on the fork tubes and steering shaft with penetrating oil and tap off from below with light blows.
4.1. Remove lock washer.
5. Loosen and unscrew the counter nut. Remove rubber washer (if present).
6. Hold the lower triple clamp upwards, unscrew the steering head bearing adjusting nut, pull the triple clamp out downwards.
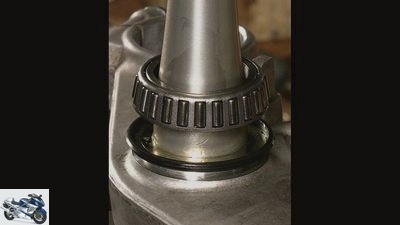
7. Remove the dust seal, inner bearing ring and ball bearing ring from the upper steering head bearing.
8. Pull the lower ball ring off the steering shaft tube. Clean parts.
Check bearing shells and inner rings
1. Visually check the condition of the bearing shells in the frame and inner rings: They must not be damaged, run in, punctured in places or otherwise damaged (e.g. corrosion).
2. The bearing shells must sit tightly in the frame with no play, the lower bearing inner ring firmly on the steering stem.
3. All bearing balls or tapered rollers must be perfectly round and must not have any flat spots, depressions (“craters”), broken material, worn or hammered spots. If the bearings are defective, they must be replaced. A conversion to tapered roller bearings requires extremely precise preparation of the bearing seats and the most careful adjustment, because their breakaway torque is higher than that of a ball bearing. Incorrectly adjusted tapered roller bearings can cause chassis problems such as swinging and shaking the handlebars!
Removal and installation
Schermer
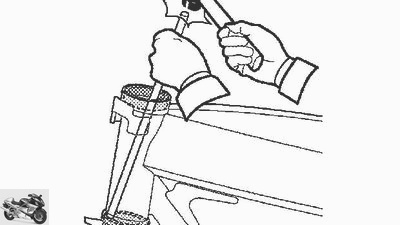
With a mandrel inserted diagonally through the steering head, the outer bearing shells can be carefully driven out crosswise.
Remove steering head bearing
When replacing the bearings, completely new bearing sets are installed at the top and bottom. Special tools for removing and installing bearings work with threaded spindles without heating. The following describes how to replace the bearings using the traditional artisan method.
1. Use a long mandrel and a 250-gram hammer to gradually drive out the upper and lower bearing shell in a criss-cross pattern with light blows.
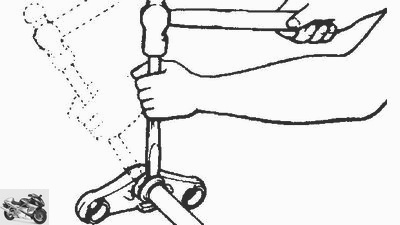
2. The inner ring of the lower bearing is still sitting on the steering stem. Clean it free of grease, briefly warm it up with a hot air blower, place the entire component on a stable wooden base and carefully drive the inner ring off its seat with a hammer and chisel.
Schermer
When removing the lower bearing inner ring, gentle blows all around are the safest method.
Install steering head bearing
! The bearings in the steering head of the frame and on the steering stem of the fork bridge are meticulously cleaned.
! The bearing points must not have any mechanical or corrosion-related damage or deformation.
! All stock parts are new.
! Place the outer bearing shells in the freezer for an hour; in this way they contract and are easier to install. If the seats of the bearing rings in the frame are worn out, a loose fit of the bearings can be prevented with a special bearing adhesive. Apply a thin layer of adhesive to the outside of the bearing ring shortly before installation. It is better to mill the bearing seat exactly and only then glue in the bearing shell. Good dealers have the special tools you need. More details on the homepage of the “warehouse guru” Emil Schwarz (www.emilschwarz.de).
1. Slowly heat the new lower bearing inner ring to 80 to 100 degrees with a hot air blower, hot plate or oven. Touch only with heat protection gloves!
2. Slide the dust cover all the way down onto its seat.
3. Thread the heated inner bearing ring onto the cold steering shaft tube, slide it down onto the seat and press it onto its seat with a suitable piece of tube and short blows of the hammer.
4. Carefully warm up the upper and lower bearing seat on the frame with the hot air blower. Do not burn off the paintwork.
5. Now take the cold bearing shells out of the refrigerator and insert them into the bearing point in the steering head from above and below.
Important: The lower bearing shell does not initially hold by itself, so push it all the way up with two hammer handles and hold it against the stop until the shells are firmly in place. It is more elegant to push an M10 or M12 threaded rod through the steering head, to put a large washer on top and bottom and to brace these slightly against each other with two nuts.
6. Put good grease in the bearing shells and on the rolling bearing rings.
7. For ball bearings: thread the lower ball ring over the steering shaft tube and place it on the lower inner ring.
7.1. Insert the steering shaft from below into the frame head and hold it up with your hand.
7.2. Insert the upper ball ring, insert the inner bearing ring, slide on the dust cap, screw on the bearing adjusting nut, tighten hand-tight.
8. Swivel the fork bridge five times from stop to stop so that the bearings are correctly seated.
8.1. Loosen the adjusting nut by 1/2 turn again and then carefully adjust the steering head bearing.
9. Attach the upper triple clamp, finger-tighten the steering stem head nut. Mount the fork legs and handlebars.
10. Tighten all screws and nuts to the specified torque. Alternately increase the tightening torque of the clamping screws of the fork in small steps.
workshop
PS technology special
Further training for motorcyclists
read more
Related articles
-
Change the steering head bearing
counselor workshop Change the steering head bearing Change the steering head bearing Change the steering head bearing If the bearing in the steering head…
-
Adviser: change the wheel bearing
Schermer 7th pictures Schermer 1/7 Changing the wheel bearing Step 7: When driving in, carefully tap into the outer ring with a mandrel.. Schermer 2/7…
-
Advice: check and adjust steering head bearings
Cook 9 pictures Cook 1/9 Checking and adjusting the steering head bearing – Step 2: Loosen the central nut on the steering shaft. Only use a nut and a…
-
Advisor This is how the steering head bearing stays fit
counselor workshop Advisor This is how the steering head bearing stays fit So the steering head bearing stays fit Screwdriver tip part 2 The second part…
-
Cook counselor workshop Adviser: Change Simmerrings Adviser: Change Simmerrings Change the oil seals on the telescopic fork If the fork oil finds its way…
-
counselor workshop Change the wheel bearing Change the wheel bearing on the motorcycle With a mandrel, hot air and bearing grease Changing wheel bearings…
-
Schermer 8th pictures Schermer 1/8 The correct distance can be found in the manual. Use a lot of feeling when re-bending. Schermer 2/8 Above the spark of…
-
Schermer counselor workshop Advice: change fork Advice: change fork Remove and install the fork properly Simmerring leaking? Fork oil change due? Replace…
-
Cook 10 pictures Cook 1/10 If you doubt your driving ability because every curve radius becomes a hexagon and the motorcycle no longer meets a line, a…
-
Change brake discs yourself – tips and tricks
Markus Jahn 9 pictures Ralf Schneider 1/9 There is a need for action here! The heat spots on the panes shown on the left can certainly no longer be…