Table of contents
- Advice: clean the carburetor Clean the carburetor
- Clean the carburetor
- Attention please!
- Remove the throttle valve
- Check membrane
- Check nozzle needle
- Remove the carburetor
- Dismantle and clean the carburetor
- Clean and check the carburetor
- Clean the carburetor part 3
- Assemble the carburetor
- More about technology
archive
counselor
workshop
Advisory: clean the carburetor
Advice: clean the carburetor
Clean the carburetor
More than 90 percent of the motorcycles registered in Germany have one or more carburettors. There are always problems with that. In this workshop sequence we analyze typical defects and say how they can be remedied.
Franz Josef Schermer
08/10/2009
Clean the carburetor
Attention please!
- Nozzles are generally made of soft brass, the carburetor housing is made of a zinc alloy.
- Do not use hard tools when cleaning the carburetor.
- Never insert hard steel wires into carburetor bores in order to remove dirt.
- If nozzle bores, bores in the carburetor housing or nozzle needles (are made of steel) get scratched or otherwise deformed, they are ripe for the garbage can and must be replaced with new parts.
Before dismantling and dismantling a carburetor battery, you should only remove the throttle valve and check whether there is dirt on the nozzle needles or (with the constant pressure carburetor) the membranes are in order.
Remove the throttle valve
1. Loosen and remove the slotted screws on top of the carburetor cover. When opening the last screw, press lightly on the carburetor cover with the thumb of your free hand, because the throttle valve spring presses against it from the inside and wants to lift the cover.
2. Take off the cover, take out the spring.
3. Carefully loosen the diaphragm all around from its seat and pull it out with the throttle slide.
Check membrane
1. Hold the membrane against a bright light source and pull it gently and carefully in different directions.
2. The membrane must be “tight”: If even a small porous area can be seen, the membrane is defective and must be replaced.
Check nozzle needle
1. Take a close look at the nozzle needle: there must be no dirt on it.
1.1. If so: Scrape it off with your fingernail, DO NOT use a knife or a file!
2. Run a fingernail lightly over the nozzle needle: The surface must be completely smooth, must not have any nicks or grooves or any raised areas.
3. Roll the nozzle needle over a glass plate: The needle must be straight and must not have a “hump”. Replace defective nozzle needle.
Remove the carburetor
1. To remove the carburetor, the tank usually has to be removed.
1.1. If there is enough space to the rear of the air filter box, it can remain installed.
2. Empty the float chambers (using the drainage screws).
3. Fully screw in the upper throttle cable adjuster on the throttle grip so that the throttle cables have a lot of play. Open the throttle grip, take the throttle cable nipple out of the mounts.
4. At the bottom of the carburetor battery: Take the nipples of the throttle cable ends out of their receptacles in the pulley, unhook the throttle cables.
5. Unhook the choke cable (if present): First unhook the abutment, pull it a little and unhook the nipple.
6. Loosen the clamps on the carburettor side of the intake manifold by a few turns.
7. Pull the carburetor battery out of the intake port and take it out.
8. Plug the open intake ports on the cylinder head with clean rags so that no dirt can get into the engine.
Dismantle and clean the carburetor
Schermer
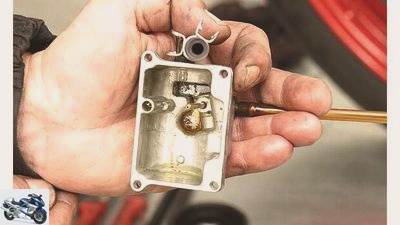
This still has to be cleaned properly: solid dirt on the nozzles and floats, deposits on the floor of the float chamber.
1. Unscrew the fastening screws of the float chamber, remove the float chamber. Most of the time, the seal between the float chamber and the carburetor is glued: tap the float chamber gently with the handle of a medium-sized screwdriver to loosen the glue.
Schermer
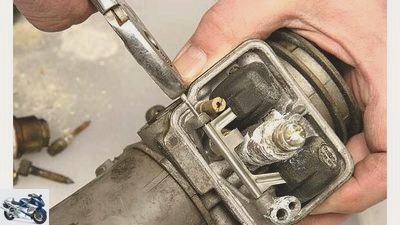
The axis of the float can usually only be pulled out in one direction: use pliers to help.
2. Pull out the holding shaft of the float with a pair of pliers or carefully (very carefully!) Loosen it from its press fit in the base with a small pin punch and gently blow it with a hammer.
Important: Make a note of the side from which the holding axle was inserted: When installing it, it must be reinserted from this (loose) side.
3. Unscrew or pull out the main nozzle, needle nozzle, nozzle holder and idle nozzle.
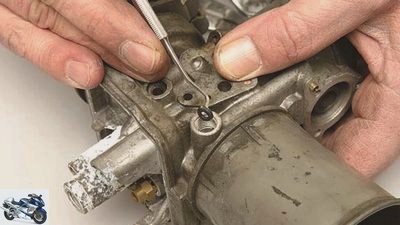
4. Unscrew the mixture control screw and the throttle slide stop screw (if present). If an O-ring is inserted in the hole in the mixture control screw: Loosen it with a small dentist’s hook and pull it out (opening photo). Insert a new O-ring when reassembling!
Clean and check the carburetor
Schermer
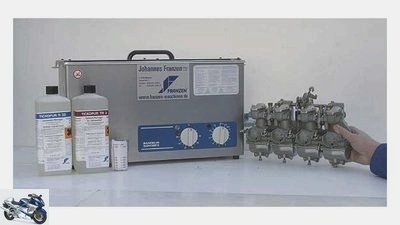
Professional equipment: Ultrasonic cleaning device with special cleaning fluid. Dirt in the gasoline system can z. B. can be flushed out with “Castrol Fuel Protect”.
1. Clean the throttle valve housing and all bores with a carburetor cleaner and blow through with compressed air. It is even better to clean the dismantled carburetor including all nozzles in an ultrasonic bath. Only this type of cleaning guarantees that all channels and nozzles are free of deposits. If you do not have an ultrasonic bath in your hobby workshop: The dealer has one; you can order cleaning from him
2. Check the throttle valve spring: Is it weakened (“worn out”), warped, damaged? Replace if defective.
3. Check the surface of the gas valve for cleanliness, grooves and rough spots. Clean the throttle slide with a carburetor cleaner. If raised or shiny “seizure areas” are found, smooth them out with fine sandpaper.
Schermer
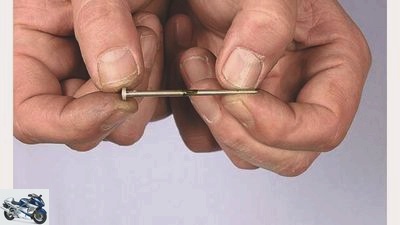
4. If dried-up gasoline residue adheres to the nozzle needle, do NOT scrape it off with hard objects or use a file, only use your fingernail. Do not bend the nozzle needle!
5. Check the choke piston: piston clean and undamaged, front sealing surface damaged or dented, spring bent or broken? Replace defective parts.
6. Check the float for cracks and other damage. Put in a container with fuel:
6.1. The swimmer has to swim.
6.2. If it’s cracked, it’ll fill up with fuel and sink. Take it out and shake it, you can hear the gas gurgling in the float.
7. Check the tip of the float needle and seat with a magnifying glass, everything must be as smooth as a child’s bottom. Even the slightest scar, pressure point or indentation in the tip of the float needle or in the needle seat makes the float valve leaky. If so: Install a new float valve.
If a new float valve is required, only install it completely with a new valve seat body; this is the only way to ensure that the valve tip and seat bore are really tight to one another.
Clean the carburetor part 3
Schermer
Assemble the carburetor
Reassemble the carburetor in reverse to disassembly. We assume that you will be in time IN FRONT Before dismantling the carburettors, you have obtained the appropriate seals:
Well-stocked specialist dealers have so-called “carburetor sealing kits” which contain all the required seals and O-rings.
Pay particular attention to the assembly:
1. Install new O-rings: Before installation, very lightly with z. B. Spray WD-40, then each O-ring slips easily into its seat.
2. Install the float with float valve, turn the carburetor upside down: the float valve is now closed.
2.1. Check the float level: This is very important for the carburetor to function properly, because if it is too high or too low, the engine is either too rich or too lean. The dimensions vary from carburetor to carburetor, from model to model: ask brand dealers, they have to know, because they have the technical vehicle documents. If the dimension from the float to the main jet or the sealing edge on the carburetor does not correspond to the specifications, bend the float tongue accordingly.
3. Screw the nozzles into the holes provided, do not overtighten.
4. Install the throttle valve, insert the spring, screw on the cover.
5. With the constant pressure carburetor: The membrane must not be hard, deformed or cracked. If in doubt, install a new membrane.
Note when installing the carburettor:
Lay the fuel and ventilation hoses neatly and attach them securely, attach clamps.
NO hose may be kinked or squashed!
1. Push the clamps onto the intake manifold (if they were removed), note the position: the ends of the clamps must sit on the protrusions of the intake manifold.
2. Spray the inside of the intake manifold very lightly with oil spray (WD-40), then the carburettors will slide in more easily.
2.1. Bring the carburetor battery into position, push it into all intake ports at the same time.
3. Tighten the screws of the clamps until the bent ends of the clamps still have some »space« to each other – do not squeeze them together completely!
4. Attach the choke cable and throttle cables.
5. Check throttle cable play, adjust if necessary: Until the throttle slide is lifted, the throttle grip should be able to be moved a little (approx. 3 to 5 mm measured around the circumference of the throttle grip).
6. Mount the tank.
6.1. Attach the fuel hose and vacuum hose (if present) to the fuel tap.
More about technology
PS knowledge: technology
- Motorcycle technology clearly explained on 97 pages (PDF)
- From starter to spark plug
- Simple teaching of physical principles
- Tips and tricks for practitioners
To the PDF for € 9.99
#image.jpg
Related articles
-
Carburetor functionality in the video
Smartereveryday 49 pictures Schoch 1/49 If the engine does not immediately idle when you let go of the throttle grip, the ability of the throttle cable…
-
Schoch 49 pictures Schoch 1/49 If the engine does not immediately idle when you let go of the throttle grip, the ability of the throttle cable to operate…
-
Adjusting the carburetor: the correct mixture composition
Schermer counselor workshop Adjusting the carburetor: the correct mixture composition Adjust the carburetor This is how the correct mixture composition…
-
Restoration of the BMW R 80 G-S, part 3 structure, carburetor, electrics
Photo: Koch 10 pictures Cook 1/10 There are reasons why the R 80 G / S is back in the workshop after just a few hours. More about this in the MOTORRAD…
-
Second hand advice Ducati 900 SS (carburetor)
Mutschler counselor Used purchase Second-hand advice Ducati 900 SS (carburetor) Second hand advice Ducati 900 SS (carburetor) Meticulous Klaus Mayerhofer…
-
Restoration of the BMW R 80 G-S part 4 engine and carburetor adjustment
Cook 23 pictures Cook 1/23 Small and big changes make the almost 70 hp of the renovated R 80 G / S. Cook 2/23 The new, original air filter sits on this…
-
Advisory: synchronize the carburetor
Schermer 5 pictures Schermer 1/5 Step 1: Preliminary work: To adjust the carburettors, they must be freely accessible. So down with the tank… Schermer…
-
Clean the motorcycle with dry ice blasting
Bilski 25th pictures Bilski 1/25 Blasting with dry ice. Bilski 2/25 Bilski 3/25 Andreas Gschweng feeds the blasting machine with the CO2 pellets cooled…
-
Advice: change fork oil and springs
Schermer counselor workshop Advice: change fork oil and springs Advice: change fork oil and springs Replace fork oil and springs Because abrasion and…
-
Second hand advice Yamaha Bulldog BT 1100
Gargolov counselor Used purchase Second hand advice Yamaha Bulldog BT 1100 Second hand advice Yamaha Bulldog BT 1100 Second hand advice Yamaha Bulldog BT…