Table of contents
- Workshop: clutch change, part 1 How to change the clutch on your motorcycle
- How does a motorcycle clutch work?
- Clutch types: multi-disc wet and multi-disc dry clutch
- The clutch play
- Remove and install clutch disks
- Remove clutch
- Check and measure the coupling
- Install clutch disc
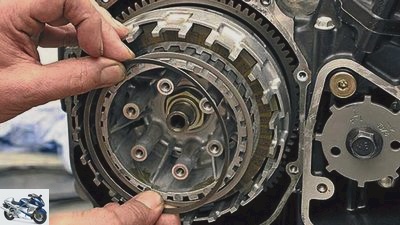
counselor
workshop
How to change the clutch on your motorcycle
Workshop: clutch change, part 1
How to change the clutch on your motorcycle
Engage first gear, release the clutch, let’s go? If the engine howls loudly and the machine still stands firm, the clutch is definitely over. Let’s move on.
08/03/2011
How does a motorcycle clutch work?
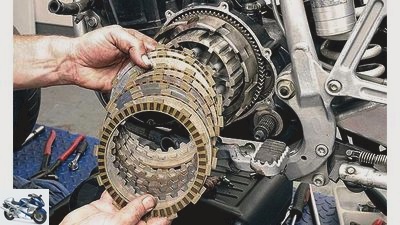
Whether wet or dry clutch, MOTORRAD shows you how to change your clutch yourself.
In most motorcycle engines, the engine power is transmitted from the crankshaft to the clutch basket via a primary drive (gear wheels or chain). This is rotatably mounted on the transmission input shaft. The external teeth of the clutch friction disks engage in grooves in the clutch basket. Between the friction disks there is a steel disk with internal teeth that engage in grooves on the clutch hub, which is firmly connected to the transmission shaft.
A pressure plate is pressed by springs against the clutch disk set, which consists of friction and steel disks, creating a non-positive connection. When the clutch lever is actuated, the clutch pressure rod presses against the clutch pressure plate and lifts it against the spring force: the friction and steel disks separate from each other, the clutch basket and clutch hub now rotate freely:
“the clutch is decoupled”. The clutch push rod is actuated by the release lever, which is connected to the clutch lever on the handlebar via a clutch cable or a hydraulic line.
Clutch types: multi-disc wet and multi-disc dry clutch
Most motorcycles have a wet multi-plate clutch built into them. It runs in an oil bath within the motor or gearbox. The rattle of the multi-plate dry clutch is one of the hallmarks of many Ducati motorcycles. The structure of the multi-disc dry clutch is similar to a multi-disc wet clutch, only that it runs outside of the engine (or transmission) and therefore not inside the engine or transmission oil. Hence its name: dry clutch.
The clutch play
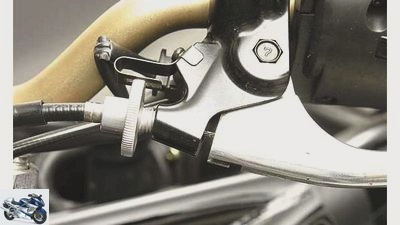
Cable operated clutch.
A defined safety clearance, the so-called “Empty travel” adjusted so that the clutch cable is neither tensioned (then there is a risk that the clutch slips) nor that the play is too great (then the clutch does not separate properly and it cracks when shifting).
Important: the clutch play only needs to be adjusted with a cable-operated clutch; with hydraulically operated clutches it adjusts itself. The clutch play is generally 1 to 3 mm between the clutch lever and the abutment on the lever bracket, resulting in 10 to 15 mm on the outside of the lever. If the distance is larger or smaller, the play must be readjusted.
Remove and install clutch disks
Depending on the load on the clutch and the age of the machine, the friction and steel disks will wear out over time – more likely on a motorcycle that is mainly driven in the city than on a highway robber. If the clutch does not establish a proper frictional connection, the following picture can be observed: Accelerating is not immediately converted into acceleration of the machine, but the engine “howls”, because the “Clutch slips”. Then either the clutch linings are abraded, broken off or otherwise damaged, or the steel plates are crooked (or both); the clutch springs can also be used “lame” have become. In such a case new friction and steel disks are installed and the springs are exchanged when the opportunity arises.
Remove clutch
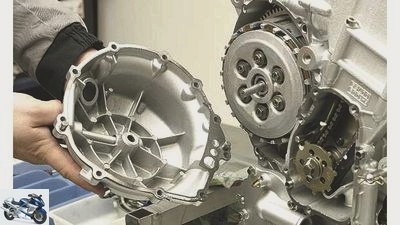
Before starting, remove the protective housing from the coupling.
To remove the clutch, place the machine on the main stand (if present) or a rear assembly stand. A notice: There are two fundamentally different clutch release mechanisms, viz “drawn” or “pressed”. When the clutch is pulled, the clutch release is inserted into the engine side cover. When actuation is pressed, the clutch release mechanism sits on the opposite side of the engine and actuates a push rod that is guided through the hollow-drilled transmission shaft. When removing and installing the clutch, clutch actuation plays a subordinate role.
Important: New friction disks must be soaked in fresh engine oil before installation. If they are installed dry, they will burn when you first use them.
- Drain the engine oil. Unhook the clutch cable from the short lever at the bottom of the engine.
- Loosen and unscrew the housing cover screws crosswise one after the other. Remove the housing cover. On older machines, the lid is usually together with the
- The seal is glued to the housing: tap the cover lightly all around with the rubber mallet, it will come off.
- Caution: not the lid or the edges of the lid and the housing to damage! Remove cover and seal. Pulled clutch actuation: While removing the cover, turn the clutch lever a little so that the toothing of the tension bolt separates from the tension lever shaft.
- Open the screws of the clutch pressure plate step by step and unscrew them crosswise, take out the clutch springs, take off the pressure plate.
- Remove friction and steel disks: If the clutch disks are to be reused, they should be put down in the order in which they were removed so that they can be reinstalled later as before and “fit together”.
Check and measure the coupling
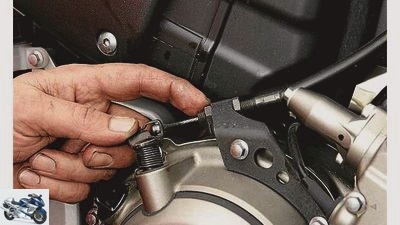
With cable-operated systems, the clutch is not only adjusted on the lever, but also on the motor.
- Measure clutch pressure springs: The wear limit of the unstressed length depends on the model.
- Rule of thumb: A used nib can be up to 3 mm shorter than a new nib.
- Use a clean rag to wipe any oil residue off all the panes. Measure the thickness of the friction disks with a vernier caliper at at least four measuring points. The amount of wear (minimum thickness) depends on the model.
- Rule of thumb: The used friction disc may be up to 0.2 mm thinner than a new one. If used friction disks still have enough friction material and are not warped, they can be reinstalled.
- Check the steel disks on the straightening plate for warpage with a feeler gauge. If they are warped by more than 0.2 mm or have a blue discoloration on their surfaces, the steel and friction disks must be completely replaced as a set.
- Pressure points can be seen where the outer claws of the friction discs in the clutch basket and the inner claws of the steel discs in the clutch hub. These are normal signs of use up to a certain depth.
- Raised edges on the claws of the friction disks can be filed down. Do not break the edges too much, otherwise the contact surface will be too narrow and the claws will crack quickly settles in the clutch basket.
- Finger test of the bearing in the pressure plate or in the pressure mushroom: The bearing must be easy to turn, must not make any loud noises and “no air” (so no game) have.
- Package size: With some machines there is a so-called “Package size”: Clean all friction and steel disks clean, assemble them in the installation sequence, press firmly together with your hand and measure with a calliper.
Install clutch disc
New friction disks must be soaked in fresh engine oil before installation. If they are installed dry, they will burn the first time they are operated.
- Insert the clutch disks in the sequence friction disk – steel disk – friction disk – etc..
- Note: If spring lock washer and spring seat ring are present, they must be installed as shown in Figure F. Clutch actuation. Pulled clutch actuation: put on pressure plate with inserted tension bolt; Align the center mark on the pressure plate with the mark on the coupling hub.
- Pressed clutch actuation: insert the push rod into the bore of the gear shaft.
- Often a ball is also installed; in most cases it sits between the clutch push rod and the push button.
- Now insert the ball, insert the pressure mushroom, put on the pressure plate. Insert clutch springs.
- Equip the screws with washers and screw them in. Tighten evenly all around step by step and then finally tighten with 10 to 12 Nm. Assemble the housing cover: clean the sealing surfaces on the motor and cover thoroughly.
- Insert the fitting sleeves in the bores in the motor housing.
- Put on a new housing seal.
- Turn the draw bolt so that its teeth point backwards against the direction of travel. Lubricate the teeth of the tension bolt thinly with molybdenum disulphide grease. Only when the clutch is pulled: When putting on the cover, turn the clutch lever so that the toothing in the tension bolt engages with the tension lever shaft.
- Put on cover, screw in screws, tighten crosswise one after the other with 10 Nm.
- Fine-tune the clutch play. Don’t forget to fill in oil!

Clutch play: in cable operated systems, this is set at the lever and at the bottom of the engine.
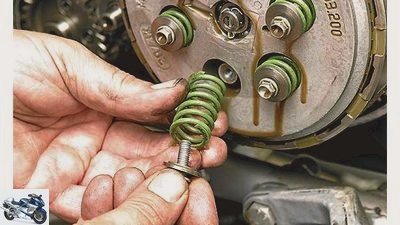
Clutch springs should be exchanged together with friction and steel disks

A reliable indicator of clutch wear is the condition of the claws on the friction disks.
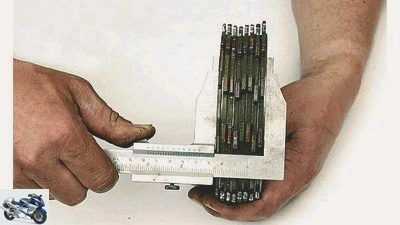
Package size: is measured in the assembled state of all panes.
Slide on the spring seat ring and spring ring in the correct order.
Related articles
-
Technology: The load change on a motorcycle
Drawing: archive counselor technology & future Technology: The load change on a motorcycle Technology: motors / drive The load change on a motorcycle…
-
Sell your motorcycle online quickly and easily
motorcycles Sell your motorcycle online quickly and easily advertisement Sell motorcycles online This is how you sell your motorcycle quickly and…
-
This is how you prepare your motorcycle for the winter break
Andreas Bildl 13th pictures Petersen 1/13 Step 1: Big Wash – Thoroughly clean the motorcycle before winter. Petersen 2/13 Step 2: Jacked up – with more…
-
Handlebars: Which shape suits your motorcycle and riding style?
Markus Jahn. accesories Handlebar: Which shape suits your motorcycle and riding style? Handlebars for various types of motorcycle Advantages and…
-
MOTORCYCLE screwdriver tips: Repair your motorcycle yourself
Sdun counselor workshop MOTORCYCLE screwdriver tips: Repair your motorcycle yourself Big overview: repair everything to do with motorcycles MOTORCYCLE…
-
Everything about seals – the correct installation and removal of motorcycle seals
Schermer counselor workshop Everything about seals – the correct installation and removal of motorcycle seals Everything about seals The correct…
-
Bilski counselor workshop Check motorcycle Basic motorcycle check Brief routine before the trip You never have time for some annoyances – unless you take…
-
counselor workshop Change the air filter Change the air filter Change the air filter Fuel consumption too high? Rough engine run? A dirty air filter can…
-
Technical question about clutch discs made of aluminum
Cook counselor technology & future Technical question about clutch discs made of aluminum Technology question – what use are clutch friction plates made…
-
fact 16 pictures archive 1/16 The primary drive and clutch shovel the mountains of torque from the crankshaft to the gearbox. A task that can only be…