Table of contents
- The basics of chassis tuning Instructions for trying it out
- Regarding the chassis adjustment methodology:
- Basic procedure for adjusting the damper
- +++ Telescopic fork +++
- Basic function of rebound damping
- Basic function of compression damping
- Basic function of the spring preload
- Basic function / setting the vehicle level via the fork length
- Basic function / setting of the steering damper
- +++ Shock absorber +++
- Basic function of rebound damping
- Basic function of the compression damping on the shock absorber
- Basic function of the spring preload
fact
12th pictures
Edge
1/12
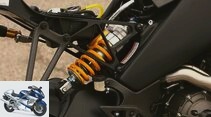
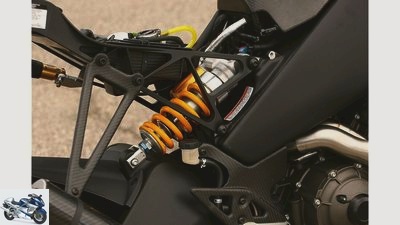
The strut sits on the right outside of the chassis without any deflection. In the limited edition an Ohlins TTX36.
Cook
2/12
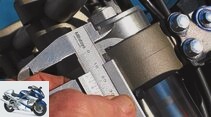
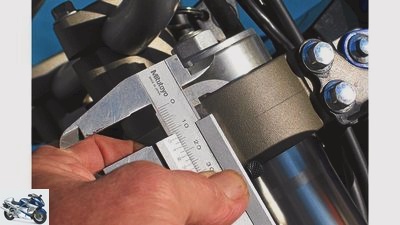
Fork protrusion: By moving the fork legs in the bridges, the steering geometry and the height of the center of gravity can be influenced.
fact
3/12
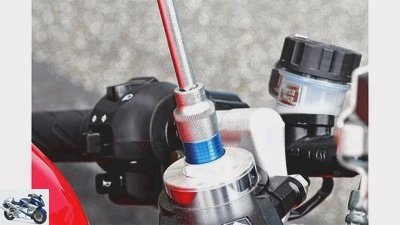
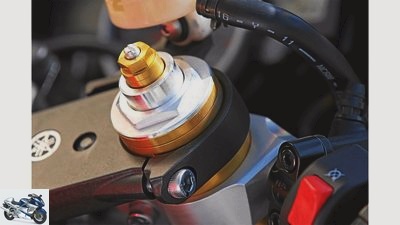
Spring preload: The suspension springs are preloaded via these threaded spindles, which allows the negative spring travel N1 and N2 to be set. The spring preload also influences the steering geometry of the machine. ATTENTION: This does not change the rebound damping setting.
fact
4/12
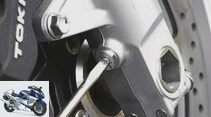
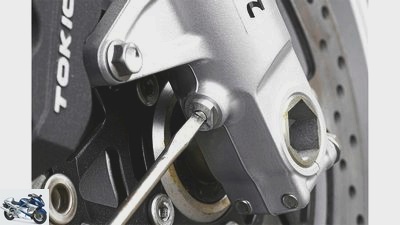
Compression adjustment: The adjusting screws are usually located at the bottom of the fork base. These screws regulate the hydraulic resistance during compression, which has a spring-supporting effect and can prevent bottoming out when braking.
fact
5/12
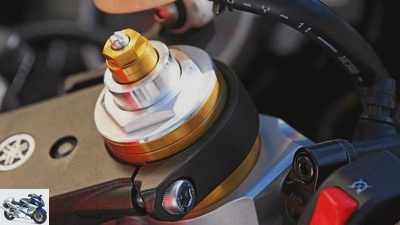
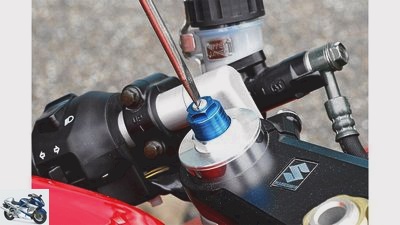
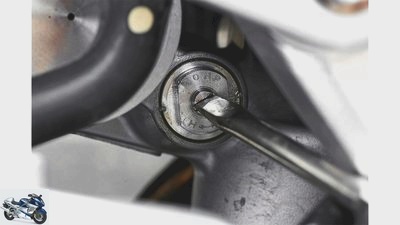
Rebound adjustment: The adjusting screws are integrated into the fork plug at the top and regulate the rebound speed. Fully screwed in, the cushioning is hard, and quite openly soft. Before checking and adjusting, run the fork and suspension “warm” so that the oil / foaming corresponds to practice.
MOTORCYCLE
6/12
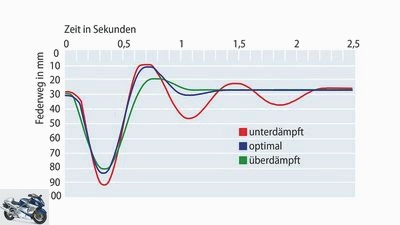
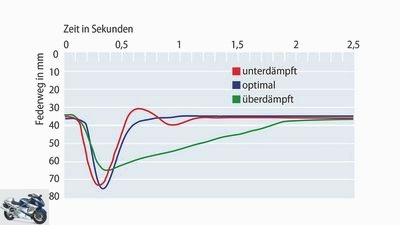
Pushing the fork: When the fork is pushed into the suspension with force, it should rebound roughly as shown by the blue line. If the fork swings back several times (red), the rebound damping must be increased, if the front comes back too slowly (green), the rebound is reduced.
markus-jahn.com
7/12
Diverse setting options that all too often remain unused. But: dare! We reveal how it works.
markus-jahn.com
8/12
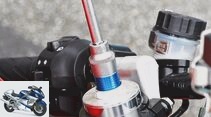
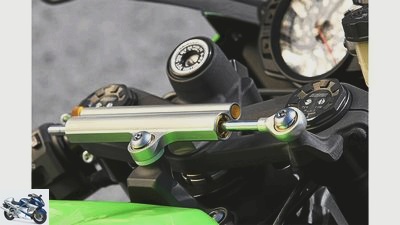
Steering damper: It must work smoothly and with even damping over the entire stroke, and all bearing points must be screwed tension-free. This component does not make a motorcycle more stable, but only serves to suppress dangerous banging of the handlebars. When setting, the following applies: as soft as possible, as hard as necessary.
fact
9/12
Compression damping: the oil flow between the shock absorber and the expansion tank is regulated by this needle valve during compression. A high level of damping, for example, protects against bottoming out with a high load, but limits the suspension comfort in solo operation. Many sports bikes can be tuned in the low and high speed range.
MOTORCYCLE
10/12
Pressing on the shock absorber: When the shock absorber is warm, pressing enables a good basic adjustment of the rebound damping. While the optimal damping (blue line) rebounds quickly, but with creamy damping, the rear sucks in overdamped (green) in the suspension or swings uncontrollably (red).
MOTORCYCLE
11/12
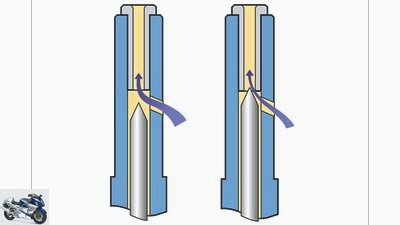
Needle adjustment in the shock absorber: Actually intended as a rebound adjustment, the oil on the piston rod on most shock absorbers also flows through the annular gap during compression. As a result, the rebound damping also influences the compression stage. Only high quality dampers work with a so-called shuttle valve on the damper rod.
MOTORCYCLE
12/12
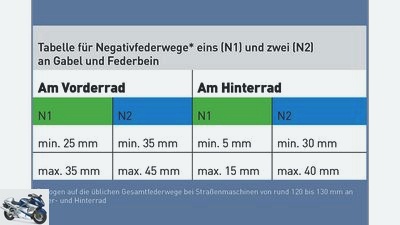
Negative spring travel table: These empirical values are used for the basic setting. N1 is required without the driver, N2 with the driver in a normal sitting position. If the difference between N1 and N2 is too great, the spring is too soft and vice versa. For a sporty driving style, the minimum values apply.
counselor
workshop
Introduction of chassis tuning
The basics of chassis tuning
Instructions for trying it out
Content of
The chassis of modern motorcycles offer a wide range of adjustment options. However, most drivers never turn the adjustment screws on their suspension elements. PS explains what happens if you do. And don’t worry – you can’t break anything. So dare to do it!
Werner Koch, Robert Gluck
04/14/2015
The chassis of sporty and super sporty motorcycles are built for the committed country road ride as well as for the rapid chase over the racetracks. The quality of the components used in the meantime is high, cheap, non-adjustable spring elements can only be found on inexpensive entry-level models. But because only a perfectly balanced chassis and synchronously working spring elements give the pilot optimal feedback and guarantee maximum safety, you should adjust your chassis to your own driver’s weight as well as your own preferences and driving habits. We explain here what happens when you turn the landing gear screws.
Buy complete article
The basics of chassis tuning
Instructions for trying it out
8 pages) as PDF
€ 2.00
Buy now
Regarding the chassis adjustment methodology:
Whenever you make any changes to the chassis, only take one step at a time and try out the effects on the driving behavior on a route you know. During the test drives, it is not important that you whip around the corners at a risky pace and on the last groove, but that you feel a change in driving behavior, feel comfortable and the motorcycle can be maneuvered as you wish.
If you are not satisfied with the settings you have chosen, go back to the previous setting and try another way to get the result you want. ATTENTION: Before each change, note down the current setting values and return to them if the result is unsatisfactory.
Basic procedure for adjusting the damper
If the slotted screws for the settings are screwed in, a conical needle narrows the flow hole, which increases the hydraulic resistance of the respective damping level, or decreases it when the screw is removed.
With all damping levels, the settings are always determined from the maximum turned, i.e. closed position. The highest damping force (hard) acts in this position. If the adjusting screw is at the maximum number of clicks or is open to the maximum, the damping force is lowest (soft).
Never turn the adjusting screw against the stop with force, as this could damage the adjusting needles. Always count the last noticeable click as the last position.
When checking the damping behavior while standing by pressing hard, the damping elements must be warm or “foamed” in the fork. The diagrams (in the picture gallery and on the two following pages) of the perceptible and visible spring movements when pressed are intended to give an impression of what a well-adjusted damping feels like.
+++ Telescopic fork +++
Basic function of rebound damping
The set screw sits in the center of the upper fork plug. The rebound damping counteracts the spring force and thus the rebound speed. This prevents the energy stored during compression from suddenly discharging. The excess spring energy is braked by a piston / cylinder system in the oil bath, the so-called cartridge. Otherwise the front of the machine would soar, swing uncontrollably and the front wheel would lose contact with the ground.
Effects on driving and suspension behavior:
Too low damping force
- When rebounding, the motorcycle reacts with too much and rapid movements.
- Unstable, doughy driving behavior in alternating curves.
- The motorcycle reacts to load changes with too much spring stroke on the fork.
- Little feeling and feedback from the front wheel.
Check when pressing while standing: the front clearly oversprings the zero position and swings several times.
Too high damping force
- The motorcycle reacts very uncomfortably to several successive bumps, cross grooves and potholes because the fork sucks into the hard spring area.
- The front can stutter when braking on a poor road surface.
- The motorcycle tends to swing in undulating curves or a restless front end.
Check when pressing while standing: the front springs back very slowly to the zero position.
Basic function of compression damping
The compression damping adjustment screw is located on the lower fork foot and supports the spring force and thus reduces the compression speed. The hydraulic resistance prevents the fork from dipping too quickly or too far when braking (high dynamic wheel load change) or when changing direction quickly (high pressure from centrifugal forces). The compression damping also promotes feedback between the tire contact patch and the driver.
Effects on driving and suspension behavior:
Too low damping force
- The motorcycle dips when braking or changing lean angles with too much and rapid movements.
- The motorcycle reacts to load changes with too much spring stroke on the fork.
- Little feeling and feedback from the front wheel.
Check when pressing while standing: Fork compresses deeply even when immersed quickly without noticeable progression and feels spongy.
Too high damping force
- The fork cannot cushion bumps, lateral grooves and potholes sufficiently, the front becomes uncomfortable and passes shocks on to the handlebars without being filtered.
- It can kick back the handlebars on bad roads.
- The front hardly dips when braking.
- Tires can jump on poor road surfaces and lose contact with the ground.
- Motorcycle tends to swing in undulating curves or a restless front section.
Check when pressing while standing: fork only compresses a little against an extremely progressive resistance and feels woody.
Basic function of the spring preload
With the threaded spindle located in the upper fork plug, the preload of the fork springs can be regulated. To do this, both spindles are changed with the same number of revolutions. Turning clockwise increases the preload, turning it in the opposite direction reduces it. The spring preload changes the negative spring travel (rebound travel) and thus the level of the machine. This level has a decisive influence on the steering geometry and thus the driving behavior (handling, stability).
ATTENTION: The spring preload does not change the spring stiffness (technical jargon: spring rate), but only the initial position of the spring process and the proportions of negative and positive spring deflection. The motorcycle can also be adjusted to the rider’s weight in a certain range via the spring preload. Rule of thumb: less preload for light riders, more preload for heavy riders. In any case, the following applies: The negative suspension travel measured with the rider, or N2 for short, is the more important value.
Effects on driving and suspension behavior:
Insufficient spring preload
- The front of the motorcycle is too low, the steering head angle and caster change in the direction of maneuverability and instability.
- The fork can block when braking hard, and the front wheel then tends to lock.
- The motorcycle is wobbly and nervous when cornering.
Check when pressing while standing: too large negative spring deflection (to do this pull the motorcycle up out of its springs).
Spring preload too high
- The front of the motorcycle is too high, the steering head angle and caster are becoming more difficult to handle.
- The front section can tend to hit the handlebars on undulating stretches because of the insufficient negative spring deflection.
- Motorcycle loses its handiness.
Check when pressing while standing: too little negative spring deflection (pull the motorcycle up out of the springs).
Basic function / setting the vehicle level via the fork length
The stanchions clamped into the triple clamps can be moved over a certain area on many sports motorcycles. If the fork is pushed through upwards, the front section is submerged, which changes the steering head angle and caster in the direction of handiness. At the same time, the machine’s center of gravity is lowered. The proportion of positive and negative spring deflection is retained.
If the stanchions are flush with the fork bridges, the front is higher, the steering head angle and caster change in the direction of driving stability.
ATTENTION: Lower the fork only to the screwed-in rings. If the front is lower, the front tires or mudguards can hit the radiator or fairing in the event of emergency braking, block the steering and damage certain components.
If the fork is pushed downwards, the brake lines must not be under tension when the fork is fully extended plus the travel of the top-out springs (around 10 to 15 millimeters).
In order to move the fork tubes, the clamps of both fork bridges and the handlebar stub must be opened without tension and then tightened again with the correct torque. The torque values are stored in the manual. If not, PS recommends with at least two M8 or M10 clamping screws per side 12 to a maximum of 18 Nm tightening torque on the lower and 25 Nm on the upper bridges.
The lower triple clamp in particular requires the specified tightening torque to be adhered to precisely, as the fork tubes can deform if the tension is too high. This can affect the spring and responsiveness as well as the durability of the fork (abrasion).
Tip: Always change one side at a time to prevent both fork legs from sagging upwards when the clamps are released. Make sure that fork bridges and stanchions are free of grease and oil to ensure that they cannot be twisted.
Basic function / setting of the steering damper
A steering damper suppresses the so-called kickback. This phenomenon can occur when accelerating due to the relieved front wheel or at high speed on bumpy asphalt.
The damping force should be changed depending on the driving style, the nature of the route and the tire construction. The faster you drive, the tighter you should adjust the setting. However, too high a damping force can impair handiness and steering precision in slow and tight corners.
ATTENTION: Never change the damping force on the steering damper while driving. After making the adjustment, make sure that the steering can be moved freely from stop to stop without any tendency to block.
As with all damping settings, turn the adjusting wheel completely clockwise and open it click by click counterclockwise to the desired position. Tip: The steering damper must start up slightly when moving (slipstick) and have an even damping force over the entire stroke. If this is not the case (air in the system), steering precision and cornering stability can deteriorate dramatically.
+++ Shock absorber +++
Basic function of rebound damping
As on the telescopic fork, a conical needle regulates the hydraulic flow resistance on the damper piston. The set screw sits on the lower eye of the shock absorber. The rebound damping counteracts the spring force and thus the rebound speed. The hydraulic rebound stage damping prevents the energy stored during compression from suddenly discharging. In the gas pressure-assisted piston / cylinder system, the oil acts as a cushioning device to slow down the excess spring energy.
This prevents the rear of the vehicle from swinging uncontrollably and keeps the wheel on the ground with even contact pressure. It should be noted that changing the rebound damping in many shock absorbers also has a certain influence on the compression damping. The reason: The needle adjustment in the piston rod releases the flow in both directions, i.e. both tension and compression (see drawing). In the event of serious changes in the rebound stage, the compression stage may have to be readjusted.
Effects on driving and suspension behavior:
Too low damping force
- When rebounding, the motorcycle reacts with too much and rapid movements at the rear.
- Unstable, spongy driving behavior in alternating curves.
- Little feeling and feedback from the rear wheel.
- Motorcycle rocks when driving over several bumps.
Check when pressing while standing: the rear springs back too quickly and without noticeable hydraulic resistance to the zero position or even swings back.
Too high damping force
- The motorcycle reacts very uncomfortably to several successive bumps, cross grooves and potholes because the shock absorber sticks in the hard spring area.
- The rear wheel can jump or move on a poor road surface.
- The motorcycle tends to swing in undulating curves.
- The low rear of the motorcycle makes it difficult to handle.
Check when pressing while standing: the tail rebounds extremely slowly and comes to a standstill before the actual zero position.
Basic function of the compression damping on the shock absorber
The adjusting screw for the compression damping force sits at the top between the strut cylinder and the expansion tank. The compression damping force supports the spring force and thus reduces the compression speed when changing direction quickly (high pressure from centrifugal forces), in fast corners and on bumps. In addition, the hydraulic resistance improves the feedback to the driver and increases the tire’s grip when leaning and when accelerating. The compression level in the low-speed and high-speed range can be set separately on some high-quality shock absorbers. The damper works at low speed with a relatively low compression speed of 10 to 80 millimeters per second and is regulated by a conical needle (slotted screw in the middle). If the machine is pushed into the suspension faster (from 100 to around 450 millimeters per second), another adjustable element comes into play, the high-speed valve. The effect of the high-speed damping can only be assessed while driving.
Tip: High and low-speed damping should always be changed together in the same direction.
Effects on driving and suspension behavior:
Too low a compression damping force in the high and low speed range
- The rear of the motorcycle dips too deep and too quickly on long, gentle bumps and in curves (too little low-speed damping).
- The motorcycle becomes unstable in the case of strong bumps or sharp changes in lean angle and compresses too deep (too little high-speed damping).
- Little feeling and feedback from the rear wheel (too little low-speed damping).
- Little grip on the rear tire when accelerating out of bends (too little low-speed damping).
Check when pushing while standing: the rear plunges deeply without noticeable hydraulic resistance and feels spongy.
Too high compression damping force in the high or low speed range
- The rear wheel cannot cushion bumps, lateral grooves and potholes sufficiently. The rear end becomes uncomfortable and passes shocks on to the driver unfiltered (too much low-speed damping).
- Handlebar bumps (caused by too hard a low-speed compression damping at the rear) can set in on poor roads.
- Tires can jump on poor road surfaces and lose contact with the ground.
- The motorcycle tends to swing in undulating curves.
Check when pushing while standing: the rear only compresses a little against an extremely progressive resistance and feels hard and woody.
Basic function of the spring preload
The spring preload is usually set by means of two locked locknuts. To change this, the upper one must be loosened with a suitable hook wrench. Turning the lower locknut clockwise increases the preload, while turning it in the opposite direction reduces it.
The spring preload changes the negative spring travel (rebound travel) and thus the level of the machine. This level has a decisive influence on the driving behavior (handling, stability) and the spring system, or the deflection angle of the swing arm. This must be in a structurally defined area.
If the angle is too flat (spring preload too low), the rear of the car can dive down when accelerating due to the chain tension, which has a negative effect on handling and cornering stability. The progressive deflection is also matched to the correct negative spring travel.
If the spring strut installed as standard is clearly too hard for light riders or too soft for heavy riders, it can be replaced. You can find out which spring rate would be suitable for you individually from your motorcycle dealer, one of the major suspension specialists, or you can read the values from the table (below). If this value does not help you, you must contact a suspension expert. When replacing the shock absorber spring, the fork springs do not necessarily have to be replaced; it is often sufficient to adjust the negative spring travel via the preload or to change the spring progression towards soft or hard via the oil volume in the fork (air cushion).
Effects on driving and suspension behavior:
Insufficient spring preload
- The rear of the motorcycle is too low, the steering head angle and caster change in the direction of unwieldiness.
- The shock absorber can block in the case of deep bumps or high payloads.
- The motorcycle is unwieldy and stiff when cornering.
Check when pressing while standing: too large negative spring deflection (to do this pull the motorcycle up out of its springs).
Spring preload too high
- The rear of the motorcycle is too high, the steering head angle and caster change in the direction of instability.
- The rear tire can lose contact with the ground on bumpy stretches because of the insufficient negative suspension travel.
- Motorcycle can lose cornering and driving stability.
Check when pressing while standing: too little negative spring deflection (pull the motorcycle up out of its springs).
Related articles
-
accesories landing gear & Spring elements Basic chassis set-up Basic chassis set-up Basic chassis set-up The chassis tuning begins with the inspection of…
-
motorcycles Suspension tuning Suspension tuning The right twist If you want to raid the curbs with momentum, you not only have to have yourself fully…
-
Chassis special: Part 6 – Troubleshooting the front of the vehicle
archive accesories landing gear & Spring elements Chassis special: Part 6 – Troubleshooting the front of the vehicle Suspension special: troubleshooting…
-
fact counselor technology & future Workshop: chassis Workshop Chassis: adjust and improve correctly Content of “I can’t get the bucket around the bends…
-
Chassis special part 1: motorcycle suspension
fact accesories landing gear & Spring elements Chassis special part 1: motorcycle suspension Chassis special: suspension Everything about motorcycle…
-
ZF equips Betamotor off-road bikes with chassis technology
beta accesories landing gear & Spring elements ZF equips Betamotor off-road bikes with chassis technology ZF equips off-road bikes Beta engine: perfectly…
-
Chassis Special: Part 5 – Troubleshooting and Basics
Jahn accesories landing gear & Spring elements Suspension special: Part 5 – Troubleshooting and basics Suspension special: troubleshooting and basics…
-
Chassis special: Part 2 – fork damping
fact accesories landing gear & Spring elements Chassis special: Part 2 – fork damping Chassis special: fork damping Front wheel damping – the dream setup…
-
Safe on the move with semi-active chassis from ZF
BMW 7th pictures BMW 1/7 This is how potholes can disappear: The semi-active chassis system from ZF brings more calm to the motorcycle set-up, and thus…
-
Technology: suspension and chassis
fact accesories landing gear & Spring elements Technology: suspension and chassis Technology: suspension and chassis New trend: Big Piston Fork New trend…