Table of contents
- Advice: adjust springs and dampers Tips for adjusting the suspension and damping
- Adjustment of the spring elements … *
- More about technology

Schermer
counselor
workshop
Advice: adjust springs and dampers
Advice: adjust springs and dampers
Tips for adjusting the suspension and damping
On modern motorcycles, spring preload and damping can be adjusted on the telescopic fork and shock absorber. Here is an overview of the setting options and detailed setting tips using the example of the popular Suzuki GSF 1250 Bandit.
Jorg Lohse, Franz Josef Schermer
03/04/2010
Spring preload options
The telescopic fork (front suspension) can be adjusted in the spring preload, the spring strut (rear suspension) in the spring preload and damper rebound. In the case of a heavy driver and a higher load (passenger and luggage), the springs should be pretensioned more so that the spring deflection and lean angle are maintained and the suspension does not bottom out.
Spring preload: When adjusting the spring preload, a spring is neither “harder” still “softer”, but it is more or less biased. This changes the height of the front or the rear, experts also say that this is how the “static zero position” of the motorcycle up or down.
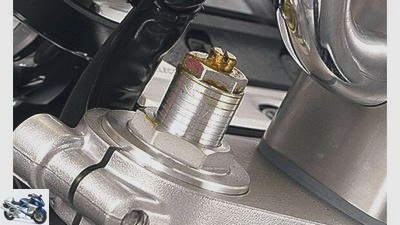
The spring preload of the telescopic fork is adjusted using adjusting screws (“Spring adjuster”), which are incorporated into the hexagonal plugs of the fork legs at the top. The adjusting screws have either a slot, a two-head or a hexagon. In order to avoid damage to the screws, only the right tool should be used.
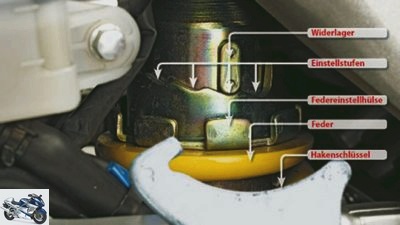
The spring preload on the rear shock absorber is made via a spring adjustment sleeve on top of the shock absorber, for which a hook wrench is used. With some models, the adjustment can also be carried out particularly conveniently using an external, hydraulic spring preload unit with a large handwheel. Another type of construction are two locknuts locked to each other, whereby you have to remove the shock absorber to adjust the spring preload, which is why locknuts are mostly used by super athletes.

Schermer
Change in the preload on the rear suspension struts. The spring does not become harder or softer when it is pretensioned, but the static zero position of the motorcycle is shifted up or down. The motorcycle should be jacked up when adjusting.
Damper adjustment options
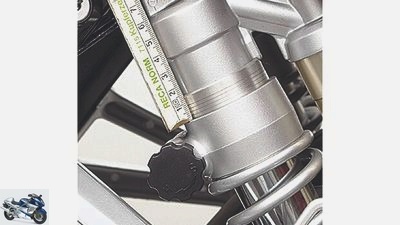
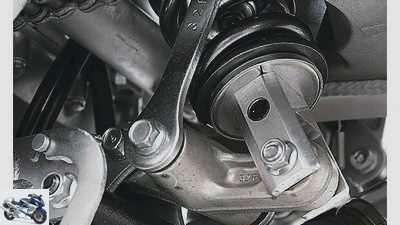
The rebound damper determines the rebound speed of the spring element and thus also of the wheel. The rebound stage is set using a damper adjustment screw. This is usually incorporated into the lower U-clevis of the shock absorber.
- The lower the load, the stronger the rebound must be set so that the suspension does not spring back too quickly into its starting position and the machine therefore rebounds.
- Conversely: the heavier the load, the weaker the rebound must be set so that the suspension can spring back quickly enough to the zero position before the next bump occurs.
Notice
- The spring preload of the left and right telescopic fork leg must always be set the same.
- Front and rear suspension must always be adjusted to match each other so that the basic geometry of the chassis is secured.
- It is completely wrong if the springs in the front fork legs are fully pre-tensioned (“spring adjuster fully turned in”) and the spring in the rear suspension strut is not or only slightly pre-tensioned (setting level 1 or 2). This means that the machine is too high at the front and too low at the rear.
- Conversely, if the springs in the front fork legs are only minimally pretensioned (“spring adjuster turned all the way out”), but the spring in the rear shock absorber is maximally (setting level 7), the machine is too low at the front and too high at the rear.
- When adjusting the rebound, first carefully screw in the damper adjustment screw clockwise all the way (see pictures), then turn it up a ¼ turn and count each turn as an “adjustment step”. Note the number of revolutions and observe how the driving behavior changes!

Schermer
Adjusting the rebound on a central spring strut. Turn the adjusting screw to the left (“S” = Soft): the damping force becomes softer. Turn to the right (“H” = hard): the damping force increases.
Practical tip
Spring adjuster on telescopic fork, spring adjusting sleeve on the rear strut and adjuster of the damper rebound stage before adjusting with z. B. Spray WD-40, which lubricates (and protects)
the little O-rings.
a notice
We have not dealt with in detail here spring elements where the pressure level (“single spring damping force”) can also be set, because these are rather rare on mid-range bikes. For the sake of completeness, however, the most important thing in brief: The setting of the pressure level supports the basic setting of the spring base in the telescopic fork and shock absorber:
- Screwing in the compression setting screw ensures that the speed at which the spring element (i.e. the wheel) compresses is slower. B. the pressure level more when you drive with a fully loaded motorcycle down a long pass road with many switchbacks.
- Unscrewing the compression adjustment screw makes the suspension respond “softer”, it becomes a little more comfortable.
Adjustment of the spring elements … *

Schermer
Spring adjusters in the fork legs in different preload levels. Use a wide screwdriver to adjust the slotted adjuster. If the setting is made using a hexagon or hexagon: it is essential to use an exactly fitting wrench.
* Non-binding, practical setting suggestions for normal driving, normal roads, adapted speed.
…depending on rider weight, passenger and payload (example Suzuki GSF 1250 Bandit)
Note: To adjust the suspension, take the pressure off the spring elements, it is best to jack up the motorcycle on a center stand.
Standard setting recommended by the factory for models GSF 1250 and GSF 1250 A:
- Spring adjustment sleeve in position 3 on GSF 1250 S and GSF 1250 SA:
- Spring adjustment sleeve in position 4 Standard damper setting for all other models.
- Damper adjusting screw unscrewed 1 2/4 to 1 3/4 turns.
Adjustment of telescopic fork
- Solo rider light (approx. 75 kg)
Spring preload 5 rings visible. - Solo rider heavy (approx. 95 kg) or lighter rider with luggage
Spring preload 3 rings visible. - With 2 people
Spring preload 1 to 2 rings visible. - With pillion passenger and luggage (full load)
Spring preload fully turned in, no ring visible. - Recommended default setting
Spring preload 3 rings visible, applies to all models with and without fairing, with and without ABS.
Adjustment of the shock absorber
- Solo rider light (approx. 75 kg)
Spring adjustment sleeve in position 1 to 2
Damper adjusting screw 1 3/4 turned out to one turn - Solo rider heavy (approx. 95 kg) or lighter rider with luggage
Spring adjustment sleeve in position 3 to 4
Damper adjusting screw unscrewed 1 2/4 to 1 3/4 turns - With 2 people
Spring adjustment sleeve in position 5 to 6
Damper adjusting screw unscrewed 1 1/4 to 1 2/4 turns - With pillion passenger and luggage (full load)
Spring adjustment sleeve in position 7
Damper adjusting screw turned out 3/4 to 1 turn
Please note: These suggested settings can vary from machine to machine, depending on the condition of the spring elements.
Find a suitable standard setting to avoid frequent adjustments!
More about technology
PS knowledge: technology
- Motorcycle technology clearly explained on 97 pages (PDF)
- From starter to spark plug
- Simple teaching of physical principles
- Tips and tricks for practitioners
To the PDF for € 9.99
#image.jpg
Related articles
-
Advice: change fork oil and springs
Schermer counselor workshop Advice: change fork oil and springs Advice: change fork oil and springs Replace fork oil and springs Because abrasion and…
-
Advice: check and adjust steering head bearings
Cook 9 pictures Cook 1/9 Checking and adjusting the steering head bearing – Step 2: Loosen the central nut on the steering shaft. Only use a nut and a…
-
Advice: Remove and maintain shock absorbers and reversing levers
Cook counselor technology & future Advice: Remove / maintain shock absorbers and reversing levers Advice: Remove / maintain shock absorbers and reversing…
-
accesories landing gear & Spring elements Basic chassis set-up Basic chassis set-up Basic chassis set-up The chassis tuning begins with the inspection of…
-
This is how it works: Adjust the spring base yourself
accesories landing gear & Spring elements This is how it works: Adjust the spring base yourself This is how it works: Adjust the spring base Adjust the…
-
Second hand advice Suzuki TL 1000 S
counselor Used purchase Second hand advice Suzuki TL 1000 S Second hand advice Suzuki TL 1000 S Early start Considered with a lot of praise in advance,…
-
motorcycles Suspension tuning Suspension tuning The right twist If you want to raid the curbs with momentum, you not only have to have yourself fully…
-
archive counselor Used purchase Honda CBR 600 RR usage advice Advice on use of the Honda CBR 600 RR The 600 super sports car from Honda Content of It is…
-
Kawasaki 12th pictures Kawasaki 1/12 Current technical status: Kawasaki ZX 10R with 43 USD fork, Big Piston damping and relatively delicate triple trees….
-
Second-hand advice Kawasaki W 650
Gargolov counselor Used purchase Second-hand advice Kawasaki W 650 Second-hand advice Kawasaki W 650 For nostalgics The start of the Kawasaki W 650 was…