Table of contents
- Advice: change fork Remove and install the fork properly
- All screws loosened? and nothing moves
- Only those who feel the torque in their wrist can do without the torque wrench
- More about technology

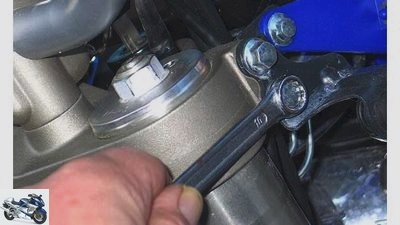
Schermer
counselor
workshop
Advice: change fork
Advice: change fork
Remove and install the fork properly
Simmerring leaking? Fork oil change due? Replace springs? Optimize damping? Regardless of the work to be done, MOTORRAD reveals how to quickly remove and correctly install the fork legs.
Werner Koch
29/01/2009
For whatever reason the fork legs have to be removed, this procedure is not that simple. It starts with the fact that the front section of the machine has to be completely relieved. This can be done either via a work stand that attaches to the lower triple clamp, or by means of a suspension on a solid cross member in the workshop. Be warned of risky mousetraps over the side stand and wobbly third leg. Because whoever has the sheet metal damage scoffs at any description.
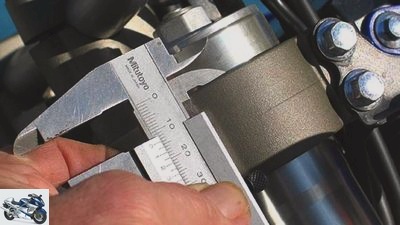
Paper, ballpoint pen, caliper – note everything down and measure it before it’s too late
1. In the first step, the brake calipers are not dangled from the cables, but from a binding wire on the lower fork bridge.
2. Before the fork legs are pulled out of the bridges, the routing of the cables and electrics should be memorized or, even better, sketched. Nothing is more annoying than having to repair incorrectly routed or kinked throttle cables after installation. Also note down all settings of the damping screws and spring preload before removing.

Schermer
Loosen the clamping screws of the upper triple clamp two turns to reduce the tension.
3. Very important for sports motorcycles: The protrusion of the fork legs over the bridges must be measured and noted. This protrusion influences the steering geometry and thus the driving behavior of the machine. A fork that is pushed through far reduces caster and increases the steering head angle for better handling, and conversely, driving stability is improved.
4. The steps apply to both upside-down forks and telescopic forks. With the latter, only tightening the clamping screws on the lower triple clamp is less time-consuming.
5. Since the upper plugs always have to be removed for fork repairs, loosen them before dismantling. First loosen the clamping screws on the upper bridge and only then loosen the fork plug with a ring spanner or socket. Otherwise, the tension is transferred to the internal thread of the immersion tube, which is why the plug can only be loosened with a lot of force.

Schermer
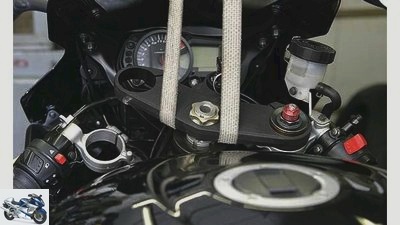
Trick for hobby mechanics: With a solid tension belt and four strong arms, the motorcycle can be completely relieved at the front.
6. Because the surface of the mostly anodized hexagon can be visually damaged, it is advisable to protect it with a layer of sturdy textile adhesive tape and to use a socket with a rounded hexagon.
7. So that the sliding bearings and friction surfaces of the fork tubes can be re-installed in their original position, the installation direction of the fork tubes should be marked with a waterproof pen.
8. This step is not necessary if the upper fork plugs generally require a fixed installation position (for example with eccentrically attached ventilation screws).
All screws loosened? and nothing moves

Schermer
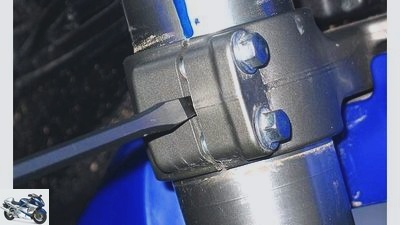
If nothing moves, the fork clamp is carefully and carefully spread open.
When clamps get stuck
9. Only now are the clamping screws of the lower triple clamp loosened by two turns and the previously cleaned bars are pulled out downwards with a slight twisting movement. It does not work? Then the fit of the clamping fist is made very tight, or a slight corrosion layer has formed. A slight pressure on the heads of the loosened clamping screws is often enough to crack the tension or the corrosion layer. In stubborn cases, help is needed. Using a screwdriver with a blade as thick as possible, you can carefully spread the clamping fist. Caution: do not drive into the clamping slot with a hammer, the surface of the standpipe could be irreparably destroyed.
10. Now the removed bars can be dismantled, repaired or converted – work that should be left to a specialist workshop or a chassis specialist. A talented hobbyist only has to swap springs and fork oil. These work steps are explained in MOTORRAD 6/2009.
11. At this point we stick to the instructions on how to properly install the renovated fork legs again. Because in principle, the steps already described apply in reverse order. Still, there are a few things to keep in mind.
12. Before installation, the fork legs should be degreased with brake cleaner in the area of the clamp. This ensures efficient and twist-proof clamping. Make sure that the marking of the installation direction is not smeared.
13. The pair of fork legs must be able to be inserted into the holes in the upper fork bridge without any tension. If this is not the case, either the stanchions or the triple clamps may be warped.
Only those who feel the torque in their wrist can do without the torque wrench
14. If the dimension of the fork protrusion noted is correct, the screws of the lower fork bridge are tightened in four steps with the torque wrench.
15. Example: Step one 5 Nm, step two 10 Nm, step three 15 Nm, step four the specified 18 Nm torque. The reason: With many upside-down forks, the plain bearings run in the area of the lower triple clamp, which can distort the stanchion tube and thus the bearing point oval if the torque is too high. The result: poor response and high abrasion.
16. If there is no information about the torque, a value of 18 to 20 Nm for the lower and 22 to 25 Nm for the clamping screws of the upper fork bridge applies to commercially available upside-down forks.
17. When the fork legs, front wheel and brake calipers are fully assembled, all screw connections (except for the lower fork back) are checked and tightened again. A loose handlebar stub or loose screws on the brake calipers can have fatal consequences.
More about technology
PS knowledge: technology
- Motorcycle technology clearly explained on 97 pages (PDF)
- From starter to spark plug
- Simple teaching of physical principles
- Tips and tricks for practitioners
To the PDF for € 9.99
Related articles
-
counselor workshop Change fork sealing rings Change fork sealing rings Change fork sealing rings Loss of oil on the telescopic fork is not just a…
-
Advice: change fork oil and springs
Schermer counselor workshop Advice: change fork oil and springs Advice: change fork oil and springs Replace fork oil and springs Because abrasion and…
-
Change the steering head bearing
counselor workshop Change the steering head bearing Change the steering head bearing Change the steering head bearing If the bearing in the steering head…
-
Adviser: change the wheel bearing
Schermer 7th pictures Schermer 1/7 Changing the wheel bearing Step 7: When driving in, carefully tap into the outer ring with a mandrel.. Schermer 2/7…
-
Adviser: change the steering head bearing
Schermer counselor workshop Adviser: change the steering head bearing Adviser: change the steering head bearing Check and replace steering head bearings…
-
Race Flex 2: Vario fork bridge for racing use
Kilianski counselor technology & future Race Flex 2: Vario fork bridge for racing use Race Flex 2 Vario fork bridge for racing use The new Race Flex 2…
-
Second hand advice Yamaha XJ 600 N-S
Bilski counselor Used purchase Second hand advice Yamaha XJ 600 N / S Second hand advice Yamaha XJ 600 N / S All-round talent With their wide range of…
-
Advice: check and adjust steering head bearings
Cook 9 pictures Cook 1/9 Checking and adjusting the steering head bearing – Step 2: Loosen the central nut on the steering shaft. Only use a nut and a…
-
Kawasaki 12th pictures Kawasaki 1/12 Current technical status: Kawasaki ZX 10R with 43 USD fork, Big Piston damping and relatively delicate triple trees….
-
fact counselor Used purchase Used advice on naked bikes Used advice on naked bikes IG Druck und Metall The strong, undisguised displacement cars are also…