Table of contents
fact
accesories
landing gear & Spring elements
Chassis special: Part 2 – fork damping
Chassis special: fork damping
Front wheel damping – the dream setup
Content of
Part 1 of the big suspension special was about spring work. Now it’s the turn of the cushioning. More precisely: the front wheel damping. Here are the right steps to your dream setup.
Volkmar Jacob
10/16/2012
fact
Help with correct front wheel damping. The dream setup.
Doing, doing, doing. Children enjoy jumping poles. What triggers happy screeching when playing with the spring bar, massively spoils the fun of gasping with the bike: sudden compression and rebound. The solution is a hydraulic damping system that counteracts strong spring movements.
First theory
Ideally, a modern fork makes the up and down of the front end nice and smooth. Put simply, the damping works like this: Oil in the fork brakes the compression and rebound movements by flowing through obstacles. Most of these obstacles consist of one or two damper pistons. They are provided with holes and so-called shims through which the oil has to pass. Shims are a type of flexible washer. Their strength and diameter determine the level of back pressure for the incoming oil. Discs of different sizes and thicknesses make up the so-called shim package – damper pistons never house just one shim. The great art is to design this package in such a way that it offers neither too little nor too much resistance to the oil. Sure so far? Well, then go on: There are two pistons in most forks. One dampens the compression movement (compression stage), the other the rebound movement (rebound stage). The damper pistons offer much less resistance to the oil in the respective opposite direction than in their “working direction”. Zero back pressure is not possible as the pistons impair the flow of oil just by their presence. The chassis developers plan this fact into the basic design of the damping. Nevertheless, the screwed-up basic tuning of forks repeatedly provokes incredulous shaking of the head among testers. Then it is good if the part offers the appropriate setting options.
Hooray, practice!
From the upper middle class, sports forks usually provide complete adjustment options. Means: spring preload, rebound and compression. We already described in the last issue how to adjust the suspension correctly. Now for the cushioning. How to start First you should know which screw adjusts which damping. On most forks, the adjusters for the rebound stage are located on the fork plug (above) and for the compression stage at the bottom of the fork base. Exceptions are examples that house the rebound stage in one spar and the compression stage in the other. Information about this can be found in the driver’s manual or the dealer. Attentive screwdrivers can also recognize this by a “C”, “R” or “Ten” on the respective adjuster. “C” stands for “Compression”, the English word for pressure level; “R” for “Rebound”, “Ten” for “Tension” (both rebound). Big piston forks are another exception.
The damping is usually adjusted using a slotted screw. Counterparts with a hexagon socket are a little rarer. Before the lively turning of the screw, however, there is the heating of the damper oil. Because cold oil is more viscous than warm oil, which affects the damping work. To warm up, simply ride your bike over uneven roads for a few minutes. It starts with the rebound damping. First step: determine the actual value. To do this, turn the screw very carefully clockwise up to the stop in order to completely close the damping. With some forks you can feel clicks, others work continuously. Simply count and note clicks. With continuously variable adjusters, one counts in half a turn: one half, one, one and a half, two, and so on. Also note this value. If you get lost while voting, you will always get back to the starting point.
Now you stand next to the bike, hold the handlebars with one hand and press hard on the fork bridge with the other – the front end should now rebound quite tough. The same game then with completely open damping. To do this, turn the adjuster in the opposite direction as far as it will go. Now the fork will probably swing significantly when you press it. The right setup is something between too tough and too fast rebound. You need a little experience to feel the perfect rebound speed. Tip: watch the video for the fork setup at www.ps-online.de. Second tip: approach slowly. To do this, carefully test drive first with the damping completely closed, then with the damping completely open on a route that is not too flat. Then, step by step, choose the set-up that makes you feel most comfortable at your speed. The basic rule is: the fork can swing slightly for the country road. On the race, tighten the rebound stage bit by bit until it only rebounds a little.
On to the pressure stage. In principle, the procedure is the same as for the rebound stage. A little experience is required when pressing while standing. To make matters worse, in this exercise only Hercules presses the fork on or near its stop. Therefore, test drives with initially extreme settings help in this case as well. When adjusting the pressure level, make sure that the fork does not bottom out brutally – neither when braking nor when just driving over bumps. On the other hand, the fork should be able to absorb unevenness in the ground and not trample over them insensitively. Buckled up? Then let’s go, try it out and finally get the fork right!
jkuenstle.de
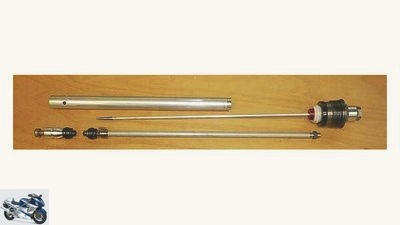
Image 1: Disassembled BMW S 1000 RR fork.
Figure 1 shows a disassembled BMW S 1000 RR fork with the entire interior except for the spring. This cartridge design (cartridge = English for cartridge, insert) corresponds in principle to that of most common forks with adjustment options for the damping. In the damper cylinder, the damper rod moves up and down in the oil bath. One of the two damper pistons, the “moving piston”, is mounted on this rod. In the hollow-drilled damper rod, the push rod runs in turn with a tip (needle valve) at the lower end for the rebound adjustment. The fork stopper forms the upper end, the “standing piston” – also known as the bottom valve – the lower one. The stationary piston regulates the compression movements (compression stage), the moving piston regulates the rebound movement (rebound stage).
jkuenstle.de
Fig. 2: Disassembled compression piston.
Figure 2 shows a disassembled compression piston. The damper piston with the shims and the shuttle valve sits on the carrier element. This valve ensures the unimpeded return of the oil during the rebound movement. When working out a basic setup, the great art is to put together suitable shim packages for the two damper pistons.
jkuenstle.de
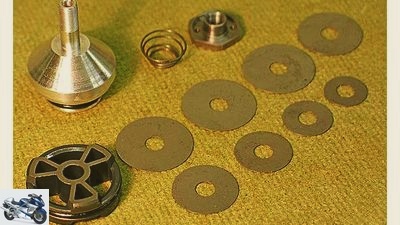
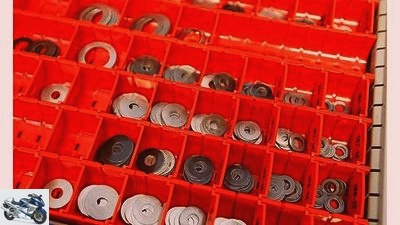
Photo 3: The platelets.
Professionals choose the platelets from a variety of different outside and inside diameters and thicknesses (Fig. 3).
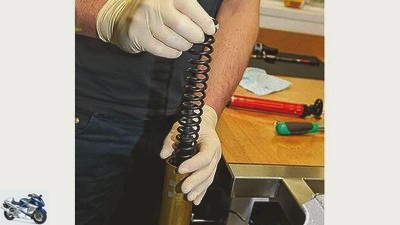
jkuenstle.de
Photo 4: The spring.
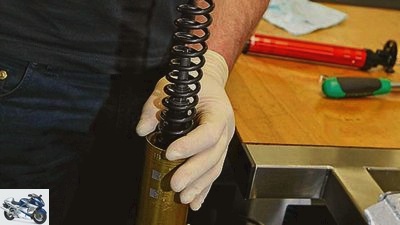
The spring works between the fork tubes and the cartridge (Fig. 4).
fact
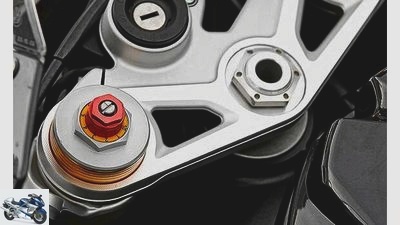
Image 1: Adjuster BMW S 1000 RR.
The majority of forks have the adjuster for the rebound stage on the top of the fork plug. One example of this is the BMW S 1000 RR (Fig. 1).
fact
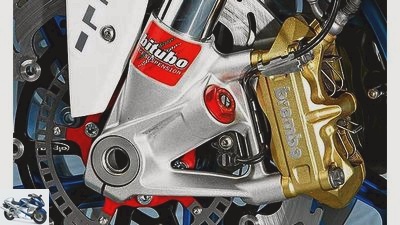
Fig. 2: Pressure stage adjustment mechanism.
The adjustment mechanism for the pressure level is on the fork base (2).
Jahn
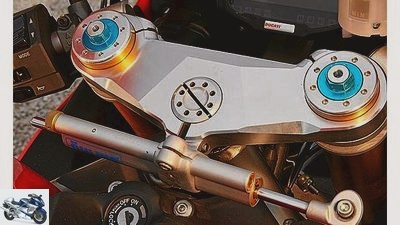
Image 3: The Ducati 1198 S has a lower-lying hexagon socket screw for adjustment.
The damping can usually be adjusted using a slotted screw. One of several exceptions is the fork of the Ducati 1198 S. It is set using a slightly deeper Allen screw (3).
Jacob
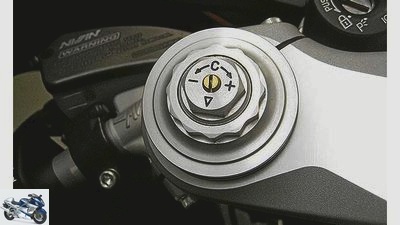
Image 4: The bars differ from the outside by stamped abbreviations such as a “C”, which stands for the English word “Compression”.
Occasionally, in series forks, the rebound stage is housed in one spar and the compression stage in the other. The bars differ from the outside with stamped abbreviations such as a “C”, which stands for the English word “Compression” (4). The photo shows the top of the left fork leg of an MV Agusta F4 1000 R. Another abbreviation is the “R” – it stands for “rebound”, the English name for rebound.
Some tuners also convert forks so that rebound and compression stages are each accommodated in a spar. Despite all the differences, all forks (and struts!) Have one thing in common: With setup tips, you first close the respective damping completely and then open it again by the specified value.
archive
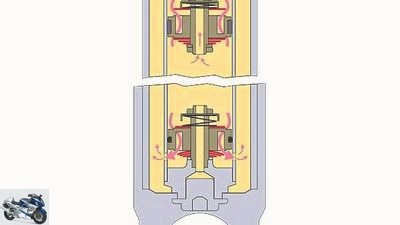
Fig. 1: How the damping works during compression.
Two damper pistons always work in conventional forks. The upper (“moving piston”) basically functions as a rebound stage, the lower (“stationary piston” or “bottom valve”) as a compression stage. The piston of the rebound stage follows the compression and rebound movement. The pressure stage is different, it is firmly screwed to the lower part of the fork. Both are permanently surrounded by fork oil (yellow). The upper picture (1) illustrates the operation of the damping during compression. If the fork dips slowly, the oil only flows through various holes in the damper piston during the compression stage. Only when immersed more quickly does the pressure increase and the oil bends the shims (red) downwards, which increases the flow rate. During compression, the oil flows almost unhindered through the piston of the rebound stage.
archive
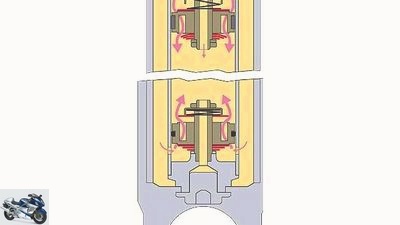
Behavior during rebound.
Exactly the other way around is the case with rebound (2). This movement pulls the rebound piston back up through the oil, causing the viscous juice to pass the piston obstacles, slowing rebound. With adjustable forks, needle valves (not in the picture) vary the opening of the central bore of the respective damper piston. This changes the size of the so-called annular gap, which either softens the damping (large opening) or tightens it (small opening). The choice of oil also influences the damping behavior. The more viscous the oil (high viscosity), the more uncomfortable the damping is – and vice versa. Common viscosities range from SAE 2.5 to SAE 20.
Wright
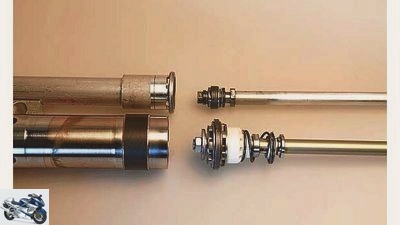
Fig. 1: Cartridge system (above) and BPF damper piston.
In a Big Piston Fork (BPF) a much larger damper piston works than in conventional forks. Reason: Instead of a cartridge system with a separate damper cylinder (Fig. 1, above), the BPF damper piston runs directly in the immersion tube (Fig. 1, below). This saves weight and at the same time increases the flow rate of the oil. This allows the oil flow to be controlled much more precisely, which improves the damping work. Another advantage: instead of two pistons, a BPF only works with a single copy, which houses both the compression and compression stages. According to experts, the increased friction in the immersion tube due to the larger side surfaces is hardly significant. Recently, Suzuki and Kawasaki were the first manufacturers to install BPF technology in their superbikes. More will follow. This technology is also in the brand new Fireblade.
Wright
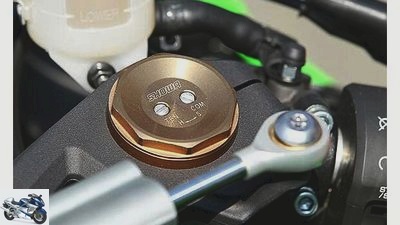
Image 2: Conveniently set the tension and compression levels from above.
Due to the design, both tension and compression can be easily adjusted from above (Fig. 2). The adjuster for the spring preload is located on the fork base.
Related articles
-
Suspension special: Part 3 – Strut damping
triumph accesories landing gear & Spring elements Suspension special: Part 3 – Strut damping Suspension special: shock absorber The right set-up for the…
-
Chassis special: Part 6 – Troubleshooting the front of the vehicle
archive accesories landing gear & Spring elements Chassis special: Part 6 – Troubleshooting the front of the vehicle Suspension special: troubleshooting…
-
Suspension special: Part 8 – fork tuning
Jahn accesories landing gear & Spring elements Suspension special: Part 8 – fork tuning Suspension special: fork tuning What are the real benefits of…
-
Technology: suspension and chassis
fact accesories landing gear & Spring elements Technology: suspension and chassis Technology: suspension and chassis New trend: Big Piston Fork New trend…
-
Suspension guide – correctly adjusting the damping, part 2
Cook counselor workshop Adjusting suspension / damping correctly, part 2 Guide: correctly adjusting the suspension / damping, part 2 A mystery for many:…
-
Chassis special: Part 10 – Tire wear
archive accesories landing gear & Spring elements Chassis special: Part 10 – Tire wear Chassis special: tire wear Inferring weaknesses in the chassis…
-
Suspension special: Part 7 – rear
archive accesories landing gear & Spring elements Suspension special: Part 7 – rear Suspension special: rear Does the motorcycle drive strange lines?…
-
Chassis Special: Part 5 – Troubleshooting and Basics
Jahn accesories landing gear & Spring elements Suspension special: Part 5 – Troubleshooting and basics Suspension special: troubleshooting and basics…
-
Chassis special part 1: motorcycle suspension
fact accesories landing gear & Spring elements Chassis special part 1: motorcycle suspension Chassis special: suspension Everything about motorcycle…
-
Advice: change fork oil and springs
Schermer counselor workshop Advice: change fork oil and springs Advice: change fork oil and springs Replace fork oil and springs Because abrasion and…