Table of contents
Schermer
counselor
workshop
Selection and assembly of motorcycle handlebars
Handlebar conversion on a motorcycle
Selection and assembly of motorcycle handlebars
Higher, wider, more colorful: handlebar conversions are at the top of the mechanics hit parade. In this workshop episode, you can read about what to consider when selecting and installing handlebars.
Franz Josef Schermer
08/30/2012
Ergonomics. That should be the keyword when it comes to handlebar modifications on the motorcycle. Only then should the look and feel follow. Of course, a particularly wide, thick or high handlebar makes an enormous impression. But the crucial question before the retrofit has to be: Does the handlebars fit the seated posture and hundreds of painless kilometers are possible in one go?
How wide can the new handlebar be? To do this, stand in front of a table, let your arms hang down loosely, spread your little fingers apart, place them on the edge of the table and measure the distance. Usually the values are between 60 and 80 centimeters. Add another five to eight centimeters to your result – you have now determined the handlebar width that is exactly right for you. Anything that is wider unnecessarily increases the effort required to turn in. The stress caused by handlebars that are too wide can be felt particularly quickly in the shoulder joints.
Buy complete article
Handlebar conversion on a motorcycle
Selection and assembly of motorcycle handlebars
2 pages) as PDF
€ 2.00
Buy now
Most types of rider will be able to get by with handlebars that are 70 to 85 centimeters wide. Of course, the type of motorcycle also plays a decisive role: A Yamaha SR 500 needs a significantly narrower handlebar than a Kawasaki Z 1000. The same applies to cruisers and choppers, where extra-wide handlebars are particularly popular for optical reasons, but not really practical.
Schermer
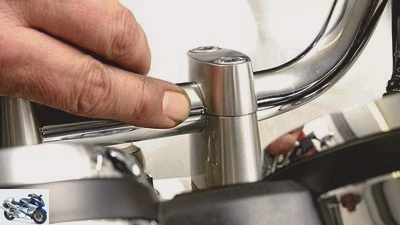
Align the punch mark on the handlebar with the clamping seam.
Try before assembling
How high can the new handlebar be? Sit on your machine (feet in the riding position on the rests) and easily reach forward to the handlebars: If you have to hunch your back and feel your weight on your wrists, pain is inevitable. Second test, if you are often on the road with a tank bag: buckle it up with the usual packing and check how you can now grip the handlebars.
It would make sense if you could get two or three different handlebars to choose from at the dealer before the actual assembly, perhaps he also has used handlebars to try out. Temporarily mount the new handlebars on your machine and try out the new seating position at your leisure. When turning it, make sure that the handlebars do not hit the tank, paneling or tank bag.
If the handlebars only need to be adjusted in height, it is sufficient to install so-called intermediate pieces in the handlebar clamps instead of a completely new handlebar. Even with a height of 30 or 40 millimeters, these spacers bring a big plus in seating and driving comfort. Alternatively, there are also higher clamping blocks that can simply be exchanged for the old ones. In any case, both versions have the enormous advantage that the work is done quickly and really inexpensive.
Schermer
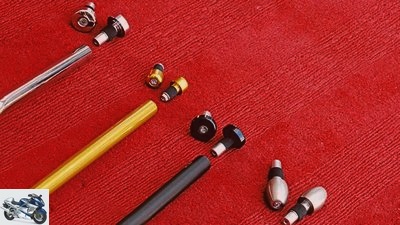
Order weights to match the new handlebars.
Preparations
If a new handlebar has to be fitted, it becomes time-consuming. Especially when a handlebar moves onto the fork bridge as a replacement for the handlebar stubs attached to the fork tubes. Before the actual assembly, the following points should be checked:
- The cutout of the fairing is enough to fit the handlebar in the correct position?
- Is there enough space so that the handlebars won’t hit anything when turned fully? All parts of the handlebars (especially the levers, expansion tanks, etc.) must have a distance of at least 15 to 20 millimeters from the fairing parts.
- Are electrical cables (from the handlebar switches to the wiring harness) long enough that they can be neatly and snugly placed on the new handlebars without being strained or pinched when the steering wheel is turned?
- Are the hydraulic lines (brake, clutch, if applicable) long enough so that they fit neatly and snugly on the new handlebars? When the steering is fully turned, they must not be stretched or jammed anywhere. The same applies to throttle cables and / or the mechanical clutch cable.
- If a new handlebar is to be mounted on the upper triple clamp instead of stubs, a new triple clamp with threaded inserts must usually be ordered for the new handlebar. Most providers have suitable sets on offer.
- Alternatively, clamping stubs with higher inserts can also be installed. In this way, the handlebars can be raised to just above the upper triple clamp. The free space in the fairing cutout is sufficient for this handlebar shape on most types of motorcycles.
- If the fittings are secured with pins, the handlebars must be drilled accordingly. The best way to do this is with a drilling template (see tool tip below right).
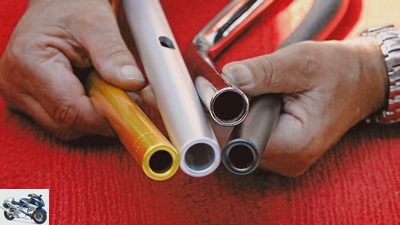
- The latest trend in continuous handlebars are conical handlebars: These measure the usual 22 to 22.2 millimeters in diameter on the outside of the handlebar ends, where the throttle grip and handlebar fittings are installed, and thicken to 28.6 millimeters in the middle. They are forged from aluminum and have a wall thickness of four millimeters. Normal steel handlebars have a wall thickness of two millimeters.
Schermer
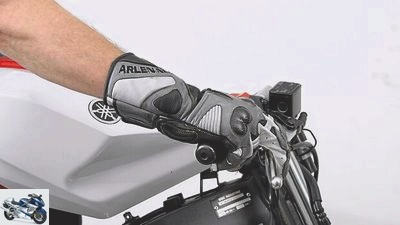
Mount the lever so that the wrists do not bend.
Tooling
Before starting the conversion work, get the tools you need to unscrew the old handlebar and mount the new one. This includes precisely fitting keys for the screw connections of the weights built into or attached to the outside of the handlebars (“vibration killers”), the handlebar clamp, the throttle housing, the mirror clamps and the handle fittings. You will also need: all-purpose spray to clean the dismantled throttle grip, light automotive grease for the attachment, compressed air to pull off the rubber handlebar grip stuck to the clutch side and good adhesive (Pattex) to stick on. A small torque wrench is important to tighten the handlebar clamping screws to 22 to 26 Nm.
Handlebar assembly
How the handlebar weight is increased varies depending on the make and model. With some (e.g. BMW) it is simply unscrewed, with most Ducatis it is plugged in, but with many Japanese it is installed in a tricky way. The general rule is: Loosen the screw and turn it two to three turns, then give the screw head a short blow with the plastic hammer so that the clamp in the handlebars is released. Most of the time, the entire weight of the handlebar can be pulled out. You may have to turn it a certain amount before you can pull it out. If you have any questions, ask the authorized dealer, they should know.
Most manufacturers have suitable weights for the new handlebar in their range. Put a drop of “Loctite medium strength” on the screw when installing.
If the new handlebars are not delivered with a general operating permit (ABE), but with a (model-related) parts certificate, an acceptance test is still pending at the end. In the end, you have to have the test center (e.g. TuV or Dekra) assessed whether you have really worked carefully.
Related articles
-
Handlebars: Which shape suits your motorcycle and riding style?
Markus Jahn. accesories Handlebar: Which shape suits your motorcycle and riding style? Handlebars for various types of motorcycle Advantages and…
-
PS reader question about ergonomics on the motorcycle
jkuenstle.de Sports & scene Motorsport PS reader question about ergonomics on the motorcycle PS reader question about ergonomics on the motorcycle Sits,…
-
Guide: Injection on a motorcycle
Drawing: Schermer counselor technology & future Guide: Injection on a motorcycle Guide: Injection on a motorcycle Find and rectify faults in the…
-
Spotlight on motorcycle production, part 3: BMW
Bilski 13th pictures Bilski 1/13 A location with tradition – the oldest halls of the Spandau plant have been in existence since 1928, and since 1939 it…
-
Schwab Sports & scene History of motorcycle tuning History of motorcycle tuning Tuners have never had it harder Content of About 50 years ago, motorcycle…
-
With the motorcycle in Colombia
Markus Biebricher, Claudia Werel 45 pictures Markus Biebricher, Claudia Werel 1/45 An additional security feature is the use of common sense. Markus…
-
fact motorcycles Report: motorcycle design Motorcycle design Ugly or beautiful? Why do we like a motorcycle at first glance and not another one at first…
-
Tips and tricks – taking photos on motorcycle trips
Jo Deleker 22nd pictures Jo Deleker 1/22 Tips and tricks: Simply take better photos. Jo Deleker 2/22 Golden ratio: One of the most important design…
-
Guide to changing the brake pads on the motorcycle
Ralf Schneider counselor workshop Guide to changing the brake pads on the motorcycle Change the brake pads on the motorcycle Tips from professionals…
-
Motorcycle parts-Bielefeld classic spare parts
Siemer counselor traffic & business Motorcycle parts-Bielefeld classic spare parts Motorcycle parts Bielefeld The slaughterhouse for motorcycle…