Table of contents
- Workshop – screwdriver tip for the inspection Carry out a post-warranty inspection yourself
- Big and small inspection
- opinion poll
- Do it yourself or not?
- Preliminary work
- Oil change
- Greasing
- Retightening screws and connections
- Brakes
- Air filter
- Candles
- Valve clearance control and throttle valve synchronization
- Conclusion

Ralf Petersen


15th pictures

Ralf Petersen
1/15
Every motorcycle must be serviced regularly if it is to function properly.

Ralf Petersen
2/15
What is needed: detergents, lubricants …

Ralf Petersen
3/15
What you need: the right tools, seals, O-rings, torque wrenches.

Ralf Petersen
4/15
Striptease: What bothers you has to be broken down.

Ralf Petersen
5/15
Simple, sensible and saves money: change the oil yourself.

Ralf Petersen
6/15
If you lubricate well, you drive well: observe the maintenance schedule.

Ralf Petersen
7/15
Tool tip: electronic torque adapter from Racefoxx.

Ralf Petersen
8/15
Avoid standing damage: clean the brake calipers.

Ralf Petersen
9/15
It has to be clean: Checking the air filter is easy.

Ralf Petersen
10/15
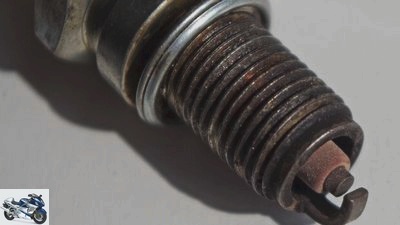
Good candle image: fawn brown, without electrode burn-off.

Ralf Petersen
11/15
Not so easy: access to the valves is often blocked.

Ralf Petersen
12/15
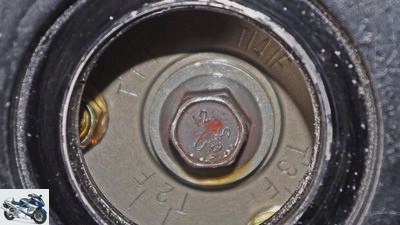
Sometimes confusing: the identification of the OT position.

Ralf Petersen
13/15
Rocker arm controlled valves are easy to adjust.

Ralf Petersen
14/15
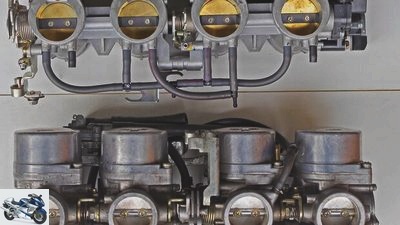
Throttle valves must work synchronously.

Ralf Petersen
15/15
Throttle setting – the Synx at work.
counselor
workshop
Workshop – screwdriver tip for the inspection
Workshop – screwdriver tip for the inspection
Carry out a post-warranty inspection yourself
After the warranty period, the inspection can also be carried out yourself: We’ll reveal some tips and tricks on oil changes, valve adjustments, brakes and more.
06/30/2020
Every motorcycle must be serviced regularly if it is to function properly. For this purpose, the manufacturers have stipulated inspections that must be carried out at certain intervals. There is actually no way around this regulation during the guarantee period. After the warranty has expired, however, everyone can decide for themselves whether, when and how they want to service their machine.
Big and small inspection
A distinction is made between a small and a large inspection. The previously usual intervals of 6,000 km for the small and 12,000 for the large inspection have already been partially extended for modern machines. However, regardless of the mileage, the machine should be used in the workshop at least once a year. The costs of an inspection are based on the required working time plus spare parts. The more complex a machine (e.g. with regard to valve actuation), the higher the costs. There are understandably worlds between the inspection costs of a Yamaha SR 500 and a Ducati Panigale.
opinion poll
Do it yourself or in a workshop? Who does the maintenance work on your motorcycle??
Voted 764 times
I do it myself.
A professional takes over for me.
A small inspection is not rocket science. If you look at a corresponding inspection plan, you will often only find the check of clutch play, candles, air filters, brake linings, etc., and only a simple check or visual inspection. A technically somewhat experienced motorcyclist can actually do this himself. In contrast to a small one, a large inspection requires a certain amount of experience and often the appropriate (special) tools. Special maintenance work must also be carried out at certain intervals. Usually fluids are changed (coolant or brake fluid, engine, cardan / gear or telescopic fork oil; the maintenance plan provides the information here). Since some motorcyclists only achieve the corresponding mileage after a few years, there is always time-dependent maintenance (e.g. fork oil change three years / 30,000 km). In the end, there remains the task of one “quality” Find a workshop. You can get information about it in Internet forums, at regional meetings, etc..
Do it yourself or not?
After the guarantee period, there is the possibility, in consultation with the (independent) workshop, to have only certain maintenance work done, to obtain oil or parts yourself and to do the simple things yourself. If you decide to do so or even want to carry out the complete inspection yourself, you should do this with planning, in stages and without time stress. For example, the work can easily be spread over several days. This is also very useful, as certain work must be carried out with a warm or cold engine. Before doing this, it is advisable to study the repair instructions carefully, and many YouTube videos are often helpful. With each work step, the removed parts are put down one after the other, then later it will also work with the assembly. Magnetic trays, which prevent screws and small parts from rolling around, as well as a range of seals for O-rings or metal seals (available from Polo / Louis, for example) are practical..
Preliminary work

Ralf Petersen
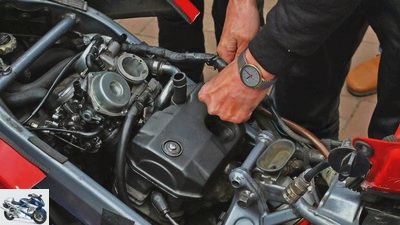
Interfering parts should be removed.
A secure stand is essential (main / assembly stand). In order to be able to carry out maintenance work at all, you often have to dismantle various parts. The seat, side cover and tank are the minimum. The tank usually has a number of hoses that are carefully removed and labeled for later assembly. For those who screw frequently, quick connectors for the fuel line are (as far as possible) a good investment.
Oil change

Ralf Petersen
The oil should be changed regularly.
Oil must be changed regularly, either after a certain mileage or after a certain period of time. 12,000 km or every two years is actually a good idea. With each change, the oil filter and seal should also be changed. The correct temperature is important when changing the oil. The engine should be warm (approx. 15 km driving distance / 80 degrees / protective gloves!). Then the oil is changed as quickly as possible.
Greasing

Ralf Petersen
In principle, all moving parts must be lubricated.
Every machine has a lubrication and maintenance plan, from which you can see which areas need to be lubricated, such as levers, the uncoated areas of the inner cables, stands, in principle all moving parts. Easily accessible points are lubricated with grease, less accessible points with clean engine oil using an oil can or Ballistol.
Retightening screws and connections

Ralf Petersen
An electronic torque adapter simplifies the work, especially for beginners.
It is also planned to check the correct tightening torque of important screws and nuts. The vibrations typical of motorcycles mean that something loosens quickly. In addition to the information on the appropriate torque, you also need the appropriate tools. Either a torque wrench or an adapter. The Racefoxx torque adapter, which turns a normal ratchet into a precision torque wrench (from 0-200 Nm), is perfect for beginners. Once you have familiarized yourself with the operation, you set the torque and tighten until you hear the beep. It is also practical that you can save up to ten different torque settings.
Brakes

Ralf Petersen
Cleaning the brake calipers is also part of this.
According to the maintenance plan, they actually only need to be checked for wear. Depending on the design (e.g. with floating caliper brakes), the pads are not always clearly visible. I therefore always dismantle the pliers, clean the pistons and lubricate any sliding bolts that may be present. This avoids the typical damage to the booth. When changing the brake fluid, especially with ABS systems, you follow the manufacturer’s specifications. An (expensive) workshop visit is then often unavoidable.
Air filter

Ralf Petersen
Checking the air filter is relatively easy.
It is checked for soiling and changed if necessary; there are often recommended intervals for this. The airbox is usually easily accessible and the test is simple. The intake manifold and rubber hoses are also checked for aging and cracks.
Candles

Ralf Petersen
The candle image should be checked.
If possible, remove only when the engine is cold. Check for candle image (if the insulator and the electrode are gray to light brown discoloration, the combustion is OK) and the correct electrode gap (vehicle manual). If the edges are burned round or if the distance is too great, the candles are worn out. Carefully screw it in with your hand and feel and tighten with the correct torque (often only 10–30 Nm!).
Valve clearance control and throttle valve synchronization
Both maintenance work requires experience as well as (special) tools, testers, etc. If the valve clearance is changed, the synchronization must then also be checked.
Valve clearance: The valve clearance adjustment is generally considered to be very difficult. Once you have understood the principle, however, it is quite simple. It is always checked when the engine is cold. The first problem is accessibility. In order to get to the valves at all, the cylinder head cover must be dismantled and, if necessary, half the motorcycle must be dismantled. The second problem is finding the right position to test or adjust the valves. After removing one or more smaller covers, the crankshaft can usually be turned with a ratchet and a suitable nut (alternatively by turning the rear wheel with the gear engaged), and you have a view of the pole wheel with the corresponding markings for top dead center (TDC).

Ralf Petersen
Access to the valves is difficult to achieve.
But only those who have understood the system of a four-stroke engine can work with it, because the work cycle consists of four strokes and thus two complete revolutions of the crankshaft. So you not only have to watch the TDC marking, but also the valves in order to find the right cycle for setting (compression cycle – all valves are closed at TDC). And that for every cylinder. For example, there are four different markings on a VFR 400.

Ralf Petersen
The labeling of the TDC position can be confusing at times.
If you have adjusting screws to correct the valve clearance (whether rocker arms or rocker arms), then you only need a suitable feeler gauge and patience and a little sure instinct. With bucket tappets with shims (so-called shims) you have to get the right shims, and changing them is often complicated. In the worst case, even the camshafts have to be removed – that is reserved for specialists. Whether the game is correct and whether it needs to be corrected at all can be checked for both variants by measuring the specified distance with a feeler gauge, which “sucking” must slide between valve and rocker arm / rocker arm or cam. Sounds extremely complicated, but once you’ve seen or tried it, it’s easy to do.
Throttle valve synchronization (carburetor and injector): Only when all throttle valves work equally will all cylinders receive the same amount of fresh gas and run smoothly, responsiveness and consumption. You only have to synchronize engines with at least two throttle valves and at least two cylinders. This requires the manufacturer’s specifications regarding the speed (1,300–2,000 rpm) and the procedure, hoses / adapters and a measuring device. These can be classic negative pressure watches or electronic measuring devices, e.g. B. Synx (economical screwdrivers can even build something like this themselves – instructions can be found online) The test is carried out with the engine warm (80 degrees). Since the motor must be running for adjustment, it is essential to ensure adequate ventilation. It is best to place the machine in front of the garage. Usually you have to dismantle the tank in order to access the adjusting screws of the throttle valves.

Ralf Petersen
The throttle valves must work synchronously.
However, since the engine needs gasoline to run, you have to provide an appropriate supply. Either through a supply line to the tank or a petrol bottle. If the carburettor or the injection system are exposed, moving parts are lubricated and hoses and rubbers checked for cracks or damage. Between the throttle valve and the intake port of each cylinder there are either adapters with attached rubber caps or screws that are first removed and then replaced by adapters. After installing the measuring device hoses, the vacuum can then be measured with the engine running. The throttle valves are regulated using adjusting screws. One throttle valve is fixed, the others are movable. The actual setting is simple. Turning the adjusting screws changes the position of the throttle valve and thus the fresh gas supply. With the help of the measuring device and with calm and feeling, this is no witchcraft either. Once everything has been reassembled at the end, you should start with a careful test drive (preferably just around the block) and check all functions.
Conclusion
In order to carry out the inspection yourself, you need some manual skill. In particular, valve clearance control and throttle valve synchronization can be described as the supreme discipline.
Related articles
-
Screwdriver tip for the check before the main inspection
Ralf Petersen 14th pictures Ralf Petersen 1/14 Don’t forget: papers, ABEs, tire approvals and a key for the steering lock. Ralf Petersen 2/14 Only with…
-
Service check: inspection costs
Harley-Davidson motorcycles Service check: inspection costs Overview of inspection costs What does the professional service cost? Whether for warranty…
-
Screwdriver tip: retreading wheels
Ralf Petersen 15th pictures Suzuki 1/15 So that everything runs smoothly. The screwdriver tip for everything to do with bikes. Ralf Petersen 2/15 What…
-
Screwdriver tip – care and inspection of the suspension struts
Photo: Ralf Petersen 14th pictures Ralf Petersen 1/14 1: Classic, beautiful and easy to adjust: stereo shock absorbers. Ralf Petersen 2/14 2: Efficient -…
-
Screwdriver tip exhaust system – Honda CB 750 Seven Fifty
Ralf Petersen 14th pictures Ralf Petersen 1/14 The starting point: a Honda CB 750 Sevenfifty for 850 euros, first registration February 1994. Ralf…
-
Screwdriver tip on the subject of valve control
Ralf Petersen 15th pictures Ralf Petersen 1/15 The valve train controls the gas exchange in a four-stroke engine with the help of the inlet and outlet…
-
Basic screwdriver tip for the 1st tool collection
Ralf Petersen 13th pictures Ralf Petersen 1/13 This screwdriver tip is about the most elementary basics. Everyone started out very small and simple. For…
-
Screwdriver tips for motorcycle seats
Ralf Petersen 13th pictures Ralf Petersen 1/13 Ralf Petersen 2/13 Ralf Petersen 3/13 Ralf Petersen 4/13 Ralf Petersen 5/13 Ralf Petersen 6/13 Ralf…
-
Bilski 44 pictures Bilski 1/44 “There is work going on here!” – Impressions from Mike Krons restoration workshop. Bilski 2/44 “There is work going on…
-
Bilski counselor workshop Avoid workshop annoyance Avoid workshop annoyance The right tone, the right approach Why a workshop means stress for many…