Table of contents
- Advisory: service the fuel tap Maintain fuel cocks properly
- Vacuum fuel tap
- Disassemble and assemble the fuel tap
- More about technology

Schermer
counselor
technology & future
Advisory: service the fuel tap
Advisory: service the fuel tap
Maintain fuel cocks properly
Petrol taps are slowly becoming extinct because most motorcycles today have fuel injection and fuel pumps. But there are still enough machines that pull the fuel from the tank into the carburetor through the tap. And if it is dirty or defective, good advice is expensive. Here are all the petrol tap tips and tricks.
Thorsten Dentges
05/01/2010
The fuel is supplied to the carburetor by simply draining the petrol, because the tank is positioned higher than the carburetor (“fall petrol”). A fuel tap is attached to the top of the tank, which is usually a manually operated component with the positions “ON” (open), “OFF” (closed) and “RES” (reserve). A filter is installed in the fuel tap to prevent impurities from entering the carburetor from the tank.
Important: Clean the fuel filter of the fuel tap during every major inspection, preferably when the tank is dismantled for other maintenance work.
- Draining petrol from the tank: Pull off the petrol hose from the tank, push on another long hose and insert its lower end into a suitable container (petrol can). Turn the fuel tap to RES, allow the fuel to drain completely.
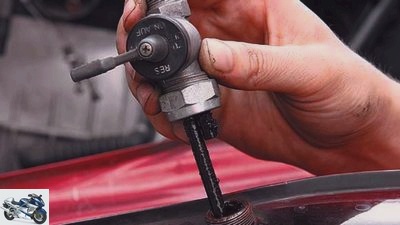
- Unscrew and pull out the fuel tap.
2.1. If the fuel valve is fastened with a union nut, open it with an exactly fitting open-end wrench while holding the fuel valve with your hand.
2.2. If the fuel tap is fastened with screws: This open-
Nen, unscrew and loosen the fuel tap by gently wiggling it, then there is a chance that the seal will remain intact and can be used again during assembly. - Remove (pull off or unscrew) the fuel filter in the fuel tap and clean it carefully. It consists of a fine nylon or metal tubular sieve that must neither be gripped hard nor blown out with strong compressed air.
Installation of the fuel tap
4.1. Make sure the seal is undamaged or use a new one.
If an O-ring is inserted between the tank and the fuel tap, thinly grease it and insert it correctly into its groove.
4.2. If the fuel tap is attached to the tank with a union nut, do not overtighten it. When tightening the union nut, hold the fuel valve with your hand in the later installation position.
4.3. Some union nuts have a right-hand thread (on the tank side) and a left-hand thread (on the fuel valve side): Position the nut the right way round, screw it evenly onto the tank nozzle and fuel valve, hold the fuel valve in a later position and tighten the nut “hand-tight”.
There are simple tips about the injection system in the next episode “Workshop Guide” in MOTORRAD 4/2010.
Vacuum fuel tap

Schermer
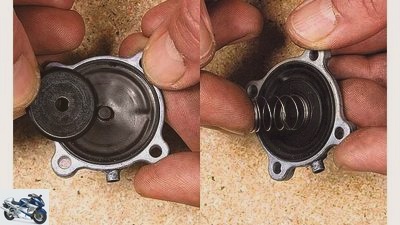
Vacuum fuel tap: assemble the diaphragm, spring retainer and spring with great care.
Japanese machines usually have a vacuum fuel tap that only allows the fuel to flow when the kick or electric starter is activated and there is a vacuum in the intake manifold due to the piston rising and falling in the cylinder. A membrane in the fuel tap then opens and releases the channel for the fuel to flow through. When the engine is switched off, there is no longer any negative pressure and the diaphragm closes the gasoline flow.
A thin vacuum hose is installed between the intake manifold and the fuel tap, which must be pushed tightly and fully onto its connection points along its entire length.
No fuel after a long time?
If the engine has not been running for a while, the gasoline level in the float chamber has dropped due to evaporation and therefore the engine takes some time to run because gasoline has to run on and fill the float chamber. If there is a PRI mark on the fuel tap, place the fuel tap on it before starting for the first time, because with PRI the fuel tap is open and fuel can flow through.
Defective vacuum fuel tap?
Test:
- Pull off the vacuum hose at the bottom of the intake port (or carburetor).
- Pull off the fuel supply hose at the bottom of the carburettor, guide the open end into a suitable container (clean tin can).
- Put the end of the vacuum hose in your mouth and suck it briefly – the vacuum must open the fuel tap and the gasoline must run out of the tank. Take a close look at the gasoline that has run into the tin can: Are there any crumbs in it? If so, these are an indication of dirt in the tank or a dirty fuel tap filter.
If no gasoline comes through the tap, this can have several causes:
- No petrol in the tank (can happen …): Switch to RES and try again.
- Petrol tap in position OFF (closed).
- If there is a PRI mark: put the fuel valve on it, the fuel valve is now open, fuel must come.
- Clogged fuel filter in the fuel tap.
- The vacuum hose between the intake port and the fuel tap is not pushed on correctly, is cracked or porous: This means that no vacuum builds up and the fuel tap does not open automatically. Fit a new hose.
- Membrane in the fuel tap defective: dry and therefore no longer elastic, torn and therefore does not react to negative pressure. Dismantle the fuel tap, install a new membrane.
Disassemble and assemble the fuel tap

Schermer
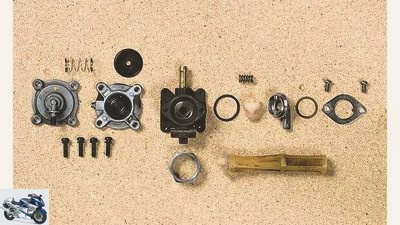
20-piece puzzle: Even beginners are not overwhelmed with disassembling and cleaning a fuel tap. Important: keep things tidy!
Disassembling a fuel tap is not a big deal in itself. But please note the following:
- Only clamp the fuel tap very gently in the vice, otherwise its housing will be pressed and may even break.
- A petrol tap that is already dirty from the outside must first be placed in rust remover for a few hours (cold cleaner, fresh petrol, diesel, kerosene), clean under running hot water with a brush – only then start screwing.
- Only clean the thread with a fine brass brush, do not use a steel brush, as this will tear the thread.
Disassemble the fuel tap
- Draw a line with a felt pen over the edge of the membrane lid and fuel tap and thus mark the installation position.
- Unscrew the diaphragm cover screws crosswise. Remove the cover with the spring.
- Remove the membrane frame from the housing. Only remove the diaphragm if it is damaged, otherwise leave it installed. If a new membrane has to be used, it must fit exactly into the frame.
- Step by step, unscrew the retaining screws of the oval washer that holds the movable inner part of the fuel valve in the fuel valve housing. A spring presses against it from the inside: press the fuel tap lever with your thumb to overcome the spring force. Unscrew the screws completely, then slowly loosen the thumb pressure and remove the inner part.
Check fuel tap components
- The inner part of the tap (“cock plug”) must be perfectly smooth at all points on the cone, the surface undamaged. This also applies to the conical seat in the housing. If damaged, replace (or grind in with fine lapping paste. If in doubt, contact a professional).
- The O-ring inserted in the groove must not be damaged.
- The washer inserted outside under the fastening ring of the lever must be present and must not be bent.
- The tubular strainer that sits on the fuel tap housing and protrudes into the tank must be present and must not have any cracks or kinks. It must not be dirty, but must be continuous in all places. Blow out dirt with soft compressed air.
Assemble the fuel cock
- Insert the fuel tap plug into the housing, insert the spring.
- Slide the sealing ring onto the lever, press the spring, insert the lugs into the cutout of the cock plug (only fits in one position)
- Thread on the shaft washer, outer ring and fastening washer, lubricate everything with a shot of WD-40 or similar, screw in the screws and tighten firmly by hand.
- Place the membrane frame including the membrane on the fuel valve housing and hold it in place. Pay attention to the correct installation position! The frame can be put on in two positions, check whether the bleeding nipple is pointing downwards.
- Place the diaphragm washer on the diaphragm, put on the spring and attach the cover. The installation position of the diaphragm and spring must not change.
- Screw in the four cover screws and tighten to 2 Nm.
More about technology
PS knowledge: technology
- Motorcycle technology clearly explained on 97 pages (PDF)
- From starter to spark plug
- Simple teaching of physical principles
- Tips and tricks for practitioners
To the PDF for € 9.99
#image.jpg
Related articles
-
Fraunhofer Institute UMSICHT examines E10 fuel
Jahn 2 pictures Jahn 1/2 E10 fuel has been available in Germany for 10 years, but it has not really caught on. The E5 fuel that it was supposed to…
-
Bilski motorcycles Shell specialty fuel Shell specialty fuel V-Power Regardless of the engine concept, Shell propagates an increase in performance of up…
-
MPS Sports & scene FUEL e-paper FUEL e-paper The digital roar Content of The FUEL cosmos continues to expand! January 17, 2017 You can not only enjoy our…
-
Report: What does the new E10 fuel bring?
archive counselor workshop Report: What does the new E10 fuel bring? What does the new E10 fuel bring? Advantages and disadvantages of the ethanol fuel…
-
Recall Husqvarna 701 Enduro LR fuel lines
Husqvarna counselor traffic & business Recall Husqvarna 701 Enduro LR fuel lines Recall Husqvarna 701 Enduro LR Fuel lines are exchanged The fuel lines…
-
Advisory: synchronize the carburetor
Schermer 5 pictures Schermer 1/5 Step 1: Preliminary work: To adjust the carburettors, they must be freely accessible. So down with the tank… Schermer…
-
Elektro-Burgman patented with hydrogen: fuel cell at Suzuki
Suzuki 9 pictures Suzuki 1/9 This is what the Burgmann with fuel cell could look like. As usual, the only missing helmet compartments are to be expected….
-
Service test: customer support helmet provider
Jenkins Photography clothing Helmets Service test: customer care helmet provider Service test: support from helmet providers Customer service from helmet…
-
Service check: inspection costs
Harley-Davidson motorcycles Service check: inspection costs Overview of inspection costs What does the professional service cost? Whether for warranty…
-
Service: Insurance tariffs 2017
Jakub Jirsk, Fotolia counselor traffic & business Service: Insurance tariffs 2017 Service: Insurance tariffs 2017 Full coverage First they promise the…