Table of contents

Schermer
counselor
workshop
Change brake fluid
Change brake fluid
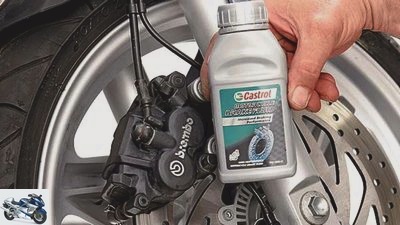
Fill the brake system with new fluid
Soft pressure point, spongy brake. It is high time to fill the brake system with new juice and bleed it cleanly. In part two we reveal everything about changing the brake fluid.
January 18, 2012
There are no compromises when it comes to braking: the braking system must be 100 percent efficient and safe on every meter of the route. A well-functioning brake system includes not only thick enough brake pads, but also regular replacement of the brake fluid. We have compiled the essential facts about brake fluid in the previous edition.
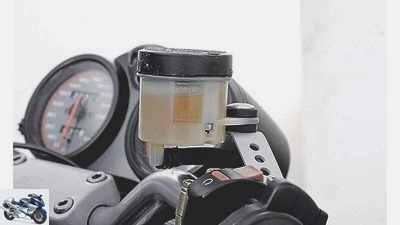
The brake fluid should be renewed at least every two years. You can tell by its color: Fresh brake fluid is usually light yellow, but depending on the manufacturer and type, it can also be colored beige, light blue or light red. It turns gray to black with age. That is an unmistakable sign that it is old and worn out. Brake fluid is “hygroscopic”, which means that it absorbs water. The older it is, the more water it has absorbed from the air. As a result, its temperature stability has decreased, and accordingly it begins to “cook” earlier.
When it is hot, real steam bubbles form, and there is a high risk that the brakes will suddenly fail under extreme conditions – for example when driving down passes or on the racetrack, where the brakes get very hot. Because the vapor bubbles are compressible and can be compressed, which is why the pressure built up by the brake lever is not passed on to the brake pistons. Result: The brake lever can be pulled through almost to the rubber grip, the braking effect is zero.
Fast drivers or bikers who are enthusiastic about passports even change the brake fluid every twelve months, as it is particularly stressed by the constant alternation of heating and cooling.
Below we explain the craftsman’s method, which can be carried out with simple means, using a hose, a transparent container and a ring spanner.
Note 1:
As a rule, in brake systems with or without ABS, the entire brake fluid is renewed when the new brake fluid is pumped through, by simply squeezing out the old one when pumping through the new brake fluid. If you are not sure whether this is also the case with your machine, you should ask your dealer in advance.
Note 2:
Older BMW motorcycles with ABS have several brake circuits, namely the respective wheel brake circuit and the associated ABS brake circuit. The front and rear brakes can also be coupled to one another: for example, with Hondas with the CBS brake system. But some of the older Guzzis from the 1970 / 80s also have a so-called “integral brake”. We urgently advise owners of such machines to have the prescribed brake fluid change done by the brand dealer, because this requires special tools, various dimensions and work step sequences have to be observed and the error memory of the on-board electronics has to be read out after the work is done.
Note 3:
On some machines, a bleed valve is attached to the hand brake pump; you can find this, for example, in modern machines with radial brake pumps.
Note 4:
The tightening torques of the vent valves in the brake calipers and the hand brake pump vary depending on the manufacturer. Please obtain these from the workshop manuals before you start working.
Standard values are:
- Tighten the vent valves in the brake calliper with SW 7 or 8 with a maximum of 8 Nm.
- Tighten vent valves with SW 11 to 15 to 18 Nm.
- The vent valve in the hand brake pump is tightened to 3 to 4 Nm.
The change

Schermer
Visual test: Old brake fluid can be recognized by its cloudy color. Should be changed every two years.
The work steps for bleeding the front and rear brakes are almost the same.
- 1. Unscrew the cover from the brake fluid reservoir and remove the support plate and membrane.
- 2. Extract old brake fluid from the container, e.g. B. with disposable syringe. Clean the inside of the container, rubber membrane, support disc and cover with a clean, lint-free cloth.
- 3. Fill in fresh brake fluid.
- 4. A bleed valve is attached to the hand brake pump and to each brake calliper: Remove the rubber caps.
- 5. First, the hand brake pump is vented at the vent valve:
- 5.1. Place the exact matching hexagonal ring spanner on the hexagon of the vent valve.
Do not use a twelve-point ring spanner or even an open-end wrench, as this will quickly “turn” the corners of the hexagon on the vent valve. Various venting valves with SW 6, 8 or 11 can be installed at the top, front and rear.
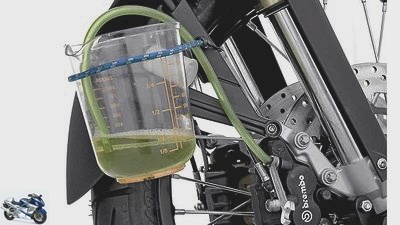
- 5.2. Put a suitable, transparent hose over the vent valve and secure it with a cable tie. Let the other end end in a clean container.
- 5.3. Pour some brake fluid into the container so that the end of the hose cannot suck in air.
- 5.4. Hang up the container so that the level of the brake fluid is slightly higher than the vent valve.
- 5.5. Add fresh brake fluid to the reservoir. Put a rag over it so that nothing spurts out when pumping.
- 6. Set the adjuster in the handbrake lever to the maximum distance.
The venting

Schermer
This is what the construction should look like for venting.
- 1. Slowly (!) Pull the handbrake lever a few times until you feel resistance. “Pump” it slowly and leave the lever in its resting position for a few seconds every now and then so that the brake fluid flows in free of air.
- 2. After the fourth to fifth pumping process, slowly pull the brake lever and keep it pulled at the resistance point.
- 3. Open the vent valve 1/4 to 1/3 turn, slowly (!) Pull the lever all the way through, close the vent valve.
- 4. Slowly release the lever again and pump a few times, hold the lever in the pressure position, open and close the vent valve.
- 5. Repeat steps one to four until only clean brake fluid without air bubbles comes out of the hose.
- 6. In between, always check whether there is enough brake fluid in the reservoir: The level must not fall below the minimum mark. Refill in good time to prevent air from entering the system.
- 7. If only fresh brake fluid comes out of the bleeding hose without air bubbles, pull the brake lever through again, tightening the bleed valve “slightly” with 2 Nm.
- 8. The brake line to the left front brake calliper is then bled: To do this, repeat steps one to seven.
- 9. Then bleed the right brake caliper.
- 10. Finally bleed again at the bleed valve (hand brake pump).
Then continue working on the rear brake: Since there is no bleeding valve on the foot brake pump, only the bleeding valve in the rear brake calliper is used for bleeding.
After venting, clean the area around the venting points with plenty of warm water and a dash of dishwashing detergent and dry. Then put some silicone grease in the vent valve and press on the rubber cap. Finally, check the brake fluid level again and top up to the mark if necessary.
Related articles
-
Change brake discs yourself – tips and tricks
Markus Jahn 9 pictures Ralf Schneider 1/9 There is a need for action here! The heat spots on the panes shown on the left can certainly no longer be…
-
Brake and clutch levers care and replacement
Schermer counselor workshop Brake and clutch levers care and replacement Workshop: hand lever maintenance and new acquisition Brake and clutch levers…
-
Guide to changing the brake pads on the motorcycle
Ralf Schneider counselor workshop Guide to changing the brake pads on the motorcycle Change the brake pads on the motorcycle Tips from professionals…
-
counselor workshop Change chain kit Change chain kit Change chain kit Worn drive chains usually draw attention to themselves when driving with cracking…
-
Ralf Petersen counselor workshop Brake system screwdriver tips Brake system screwdriver tips Everything on stop If you want to move forward quickly, you…
-
Adviser: change the wheel bearing
Schermer 7th pictures Schermer 1/7 Changing the wheel bearing Step 7: When driving in, carefully tap into the outer ring with a mandrel.. Schermer 2/7…
-
Recall Moto Guzzi and Aprilia: Problems with the front brake
Aprilia counselor traffic & business Recall Moto Guzzi and Aprilia: Problems with the front brake Recall Moto Guzzi and Aprilia Problems with the front…
-
Recall BMW G 310 and C 400X: Brake calipers can corrode
Imre Paulovits counselor traffic & business Recall BMW G 310 and C 400X: Brake calipers can corrode Recall BMW G 310 and C 400X Brake calipers can…
-
Advice: change fork oil and springs
Schermer counselor workshop Advice: change fork oil and springs Advice: change fork oil and springs Replace fork oil and springs Because abrasion and…
-
Bosch patent for electric motor with ABS: brake charges battery
Bosch counselor technology & future Bosch patent for electric motor with ABS: brake charges battery Bosch patent for electric motor with ABS Brake…