Table of contents
- Tension the chain properly It’s all about the tension
- Check / adjust chain tension
- Measure chain slack / chain tension, markings
- Adjust chain tensioner / chain tension

mps photo studio
counselor
workshop
Tension the chain correctly – it’s all about tension
Tension the chain properly
It’s all about the tension
Is the chain also well tensioned? What sounds like a mundane, trite question shouldn’t be underestimated. One wrong move can have costly consequences.
Jorg Lohse
02/28/2012
A roller chain between the transmission and the rear wheel is by far the most common type of rear wheel drive. Timing belts and cardan shafts require less maintenance and last longer than a largely open and therefore unprotected chain, but a modern chain with O- or X-rings between the plates is not as bad as it is often displayed.
For a long service life of the chain, chain sprocket and sprocket, it is crucial that these three components are carefully maintained, i.e. cleaned and lubricated. But it is also very important that the chain is always properly tensioned, otherwise the drive will break after a short time. In this workshop sequence, we want to take care of measuring your slack (this is what the technician calls “chain tension”) and tensioning the chain.
preparation
The motorcycle must be jacked up so that the rear wheel can rotate freely. So DO NOT put it on the side stand! Engine OFF, transmission idling. BEFORE measuring the chain tension
the chain can be cleaned and also lubricated. You can also lubricate them afterwards, because the sag of a clean chain on clean sprockets can be measured a few percentage points more precisely than when fresh grease is on the rollers and sprockets and therefore “spreads”.
Check whether the chain guard (also known as the “chain guard” or “swing arm guard”) is sufficiently thick on the front of the swing arm and is not worn through at any point. If the chain guard is damaged, it must be replaced, otherwise the link will be abraded by the chain – this causes additional chain wear and can even damage the link very seriously.
Check / adjust chain tension

Schermer
Note the markings for evenly tensioning the chain.
Exact chain alignment is the first prerequisite for the rear and front wheels to run in one track.
Note 1:
The chain is loosest on a jacked up, unloaded motorcycle with the rear wheel fully extended.
Note 2:
If the weight of the rider, a pillion passenger and then perhaps the luggage causes the rear wheel to compress, the rear axle (this is the center of the rear wheel and thus also the chainring) moves away from the transmission output shaft (on which the pinion sits) The chain becomes tighter.
Search for a measuring point
In the course of its life, a chain warps irregularly, and chain pinions and chain sprockets also wear out unevenly, and they can also “slip”. Therefore turn the rear wheel with one hand and with the other hand gently push the chain upwards, rocking the lower part: This is how the tautest point is sought, there is the measuring point.
Rule 1:
When the motorcycle is on the main stand and the rear wheel is fully extended, the chain slack is greater.
Rule 2:
If the motorcycle is parked on the side stand and the rear wheel is compressed a little, the chain is “shorter”. This is the worse way to measure the current chain slack and to adjust the chain tension correctly.
If there is no main stand and you do not have a rear assembly stand on which the motorcycle can be jacked up so that it compresses and the rear wheel can be rotated freely, sit on the machine, move it slowly forwards and backwards about two meters and look for the tautest part of the chain.
Measure chain slack / chain tension, markings

Schermer
Tighten the lock nut after the adjustment work.
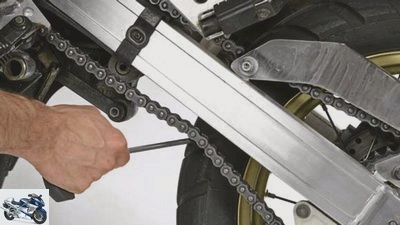
Measure chain slack
- Position / turn the rear wheel so that the previously found tautest point of the chain is as precisely as possible in the middle between the chain sprocket and the chain wheel.
- Place a folding rule at the bottom of the swing arm towards the chain.
- Pull the chain down with your finger until it is no longer possible, take the measurement on the folding rule in the middle of a chain rivet.
- Push the chain upwards with your finger until it no longer works, take the measurement on the folding rule in the middle of the chain rivet.
- The difference is the chain slack.
- In our example: pulled 72 mm down, pushed 23 mm up, results in a difference of 49 mm. This machine requires a chain sag of 20 to 40 mm.
Conclusion: The chain has to be tensioned.
Chain tension, markings
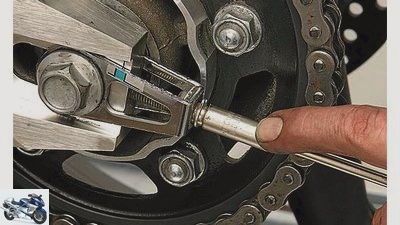
The prescribed chain tension (chain slack) differs depending on the manufacturer and model; it is mostly in the range 20 to 40 mm or 30 to 50 mm. You can find the exact information in the manual for your vehicle. On some machines, the chain slack is also shown on an adhesive on one of the swingarms (logically mostly on the chain side). Markings can be found at the end of the swing arm, usually a scale with several lines. Reference lines are e.g. B. a notch on the axle mount or the end of the axle mount itself. Some brands (e.g. Honda) have red and green wear marks above them:
- If the scale on the axle mount is in the green area, the chain is OK.
- However, if the scale gets into the red area, the chain is worn out and needs to be replaced.
Adjust chain tensioner / chain tension

Schermer
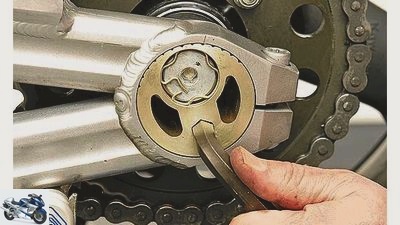
Rear axle eccentric with clamp to be released at the top.
Various chain tensioners
Adjusting the chain tension is basically the same on all motorcycles: when the rear axle is moved backwards, the chain is tensioned. The axle mount is pulled back by an adjusting screw, the stud bolt pulls the axle mount back through a nut, the axle mount is pulled back by a screw, or the axle sits in an eccentric (Kawa-saki specialty), which is around a certain Angle is twisted.
Adjust chain tension
- Loosen the rear axle nut by at least two turns so that the rear wheel can be moved easily. When a
- The cotter pin is in the axle nut, remove it beforehand: Bend it straight with pliers and pull it out.
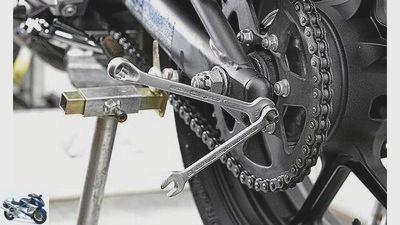
- Loosen the lock nuts of the chain tensioners on both sides by two turns. To do this, place an open-ended wrench each on the lock nut and the adjusting screw and hold the adjusting screw with one wrench.
- Use the adjusting screws / adjusting nuts to move the rear axle backwards.
- Proceed in quarter turns right – left – right – left until the chain reaches the correct slack.
- You can use the markings on the right and left at the end of the rocker for orientation. The reference points on the axle mount must be on the same markings on both sides, otherwise the rear wheel will be crooked.
Note:
If no adjusting screws are attached to move the rear axle backwards, but a thread protrudes from the rear of the swing arm and two nuts are unscrewed, then you have to turn the adjusting nuts to tension the chain. A screw is screwed in.
- Tighten the axle nut to the specified tightening torque. Make sure that the axle mounts are resting on the adjusting screws / nuts.
- Tighten lock nuts: First turn the chain tensioning screws slightly against the axle mounts “on tension”, hold the head with a key and tighten the lock nuts against the swing arm (slightly hand-tight).
Note:
If you tighten the rear axle nut with the torque wrench, the chain will tighten again a little. Therefore, before tightening, consider the chain to be “a little too loose” rather than too tight.
- When the axle nut is tightened, recheck the chain tension. Do not despair if everything has to be done all over again, because adjusting the chain tension has a lot to do with feeling and practice. If the first adjustment did not lead to the desired goal – too loose, too tight – loosen the rear axle nut again and screw the adjusting screws in or out accordingly.
Related articles
-
Tips for mechanics – correct motorcycle chain maintenance
Photo: Ralf Petersen 13th pictures Ralf Petersen 1/13 / 1 / A typical lack of maintenance: everything sparkling clean, even the chain. Ralf Petersen 2/13…
-
Advice: replace chain and sprockets
Schermer 5 pictures 1/5 The chain can be professionally riveted using a special tool (from around 100 euros). 2/5 Before installing the new chain kit,…
-
counselor workshop Change chain kit Change chain kit Change chain kit Worn drive chains usually draw attention to themselves when driving with cracking…
-
Maintenance and care of chain, cardan shaft, toothed belt
Ralf Petersen 15th pictures Ralf Petersen 1/15 Chain, cardan or toothed belt differ not only in their functionality, but also in terms of maintenance and…
-
counselor workshop Chain locks Chain locks Chain locks In most cases, it is a hell of a job to replace an endless chain: remove the rear wheel, loosen…
-
counselor workshop Change chain set Change chain set Replace the pinion, toothed wheel and drive chain Regular chain maintenance can delay the moment of…
-
Guide: Braking correctly, part 1 – without ABS
jkuenstle.de 9 pictures 1/9 Braking properly without ABS: Your colleague shows you how: knees on the tank, upper body upright, view far ahead. The arms…
-
Suspension guide – correctly adjusting the damping, part 2
Cook counselor workshop Adjusting suspension / damping correctly, part 2 Guide: correctly adjusting the suspension / damping, part 2 A mystery for many:…
-
Tinkerer builds small off-road motorcycle with a snowmobile chain
Eduard Luzianin 6th pictures Eduard Luzianin 1/6 Eduard builds a small off-road device without steering from a scooter and an old snowmobile caterpillar…
-
Suspension guide – correctly adjusting the damping, part 1
Photos: fact accesories landing gear & Spring elements Adjusting suspension / damping correctly, part 1 Guide: Adjusting the suspension / damping…